
Enbrel
Generic name: etanercept
Drug classes: Antirheumatics, TNF alfa inhibitors
Medically reviewed by A Ras MD.
What is Enbrel?
Enbrel is a prescription medicine called a Tumor Necrosis Factor (TNF) blocker.
Enbrel is used to treat moderately to severely active rheumatoid arthritis (RA). Enbrel can be used alone or with a medicine called methotrexate. moderately to severely active polyarticular juvenile idiopathic arthritis (JIA) in children ages 2 years and older. psoriatic arthritis (PsA). Enbrel can be used alone or with methotrexate. ankylosing spondylitis (AS). chronic moderate to severe plaque psoriasis (PsO) in children 4 years and older and adults who may benefit from taking injections or pills (systemic therapy) or phototherapy (ultraviolet light).
You may continue to use other medicines that help treat your condition while taking Enbrel, such as nonsteroidal anti-inflammatory drugs (NSAIDs) and prescription steroids, as recommended by your healthcare provider.
Enbrel can help reduce joint damage and the signs and symptoms of the above-mentioned diseases. People with these diseases have too much of a protein called tumor necrosis factor (TNF), which is made by your immune system. Enbrel can reduce the effect of TNF in the body and block the damage that too much TNF can cause, but it can also lower the ability of your immune system to fight infections. See “What is the most important information I should know about Enbrel?” and “What are the possible side effects of Enbrel?”.
What is the most important information I should know about Enbrel?
Enbrel can lower the ability of your immune system to fight infections. Some people have serious infections while taking Enbrel. These infections include tuberculosis (TB), and infections caused by viruses, fungi, or bacteria that spread throughout their body. Some people have died from these infections.
- Your healthcare provider should test you for TB before starting Enbrel.
- Your healthcare provider should monitor you closely for symptoms of TB during treatment with Enbrel even if you tested negative for TB.
- Your healthcare provider should check you for symptoms of any type of infection before, during, and after your treatment with Enbrel.
You should not start taking Enbrel if you have any kind of infection unless your healthcare provider says it is okay.
2. Risk of Cancer
- There have been cases of unusual cancers, some resulting in death, in children and teenage patients who started using TNF-blocking agents at less than 18 years of age.
- For children, teenagers, and adults taking TNF-blocker medicines, including Enbrel, the chances of getting lymphoma or other cancers may increase.
- People with rheumatoid arthritis, especially those with very active disease, may be more likely to get lymphoma.
Description
Etanercept, a tumor necrosis factor (TNF) blocker, is a dimeric fusion protein consisting of the extracellular ligand-binding portion of the human 75 kilodalton (p75) tumor necrosis factor receptor (TNFR) linked to the Fc portion of human IgG1. The Fc component of etanercept contains the CH2 domain, the CH3 domain and hinge region, but not the CH1 domain of IgG1. Etanercept is produced by recombinant DNA technology in a Chinese hamster ovary (CHO) mammalian cell expression system. It consists of 934 amino acids and has an apparent molecular weight of approximately 150 kilodaltons.
Enbrel (etanercept) Injection in the single-dose prefilled syringe and the single-dose prefilled SureClick autoinjector is clear and colorless, sterile, preservative-free solution, and is formulated at pH 6.3 ± 0.2.
Enbrel (etanercept) for Injection is supplied in a multiple-dose vial as a sterile, white, preservative-free, lyophilized powder. Reconstitution with 1 mL of the supplied Sterile Bacteriostatic Water for Injection, USP (containing 0.9% benzyl alcohol) yields a multiple-dose, clear, and colorless solution 1 mL containing 25 mg of Enbrel, with a pH of 7.4 ± 0.3.
Enbrel (etanercept) Injection in the Enbrel Mini single-dose prefilled cartridge for use with the AutoTouch reusable autoinjector is clear and colorless, sterile, preservative-free solution, and is formulated at pH 6.3 ± 0.2.
| Table 5. Contents of Enbrel | ||
| Presentation | Active Ingredient Content | Inactive Ingredients Content |
| Enbrel 50 mg prefilled syringe and SureClick autoinjector | 50 mg etanercept in 1 mL | 25 mM L-arginine hydrochloride 120 mM sodium chloride 1% sucrose |
| Enbrel 25 mg prefilled syringe | 25 mg etanercept in 0.5 mL | 25 mM L-arginine hydrochloride 120 mM sodium chloride 1% sucrose |
| Enbrel 25 mg multiple-dose vial | After reconstitution, 25 mg etanercept in 1 mL | 40 mg mannitol 10 mg sucrose 1.2 mg tromethamine |
| Enbrel 50 mg Enbrel Mini single-dose prefilled cartridge for use with the AutoTouch reusable autoinjector only | 50 mg etanercept in 1 mL | 25 mM L-arginine hydrochloride 120 mM sodium chloride 1% sucrose |
Mechanism of Action
TNF is a naturally occurring cytokine that is involved in normal inflammatory and immune responses. It plays an important role in the inflammatory processes of RA, polyarticular JIA, PsA, and AS and the resulting joint pathology. In addition, TNF plays a role in the inflammatory process of PsO. Elevated levels of TNF are found in involved tissues and fluids of patients with RA, JIA, PsA, AS, and PsO.
Two distinct receptors for TNF (TNFRs), a 55 kilodalton protein (p55) and a 75 kilodalton protein (p75), exist naturally as monomeric molecules on cell surfaces and in soluble forms. Biological activity of TNF is dependent upon binding to either cell surface TNFR.
Etanercept is a dimeric soluble form of the p75 TNF receptor that can bind TNF molecules. Etanercept inhibits binding of TNF-α and TNF-β (lymphotoxin alpha [LT-α]) to cell surface TNFRs, rendering TNF biologically inactive. In in vitro studies, large complexes of etanercept with TNF-α were not detected and cells expressing transmembrane TNF (that binds Enbrel) are not lysed in the presence or absence of complement.
Who should not take Enbrel?
Do not use Enbrel if you:
- have an infection that has spread through your body (sepsis).
What should I tell my healthcare provider before taking Enbrel?
Enbrel may not be right for you. Before starting Enbrel, tell your healthcare provider about all of your medical conditions.
Tell your healthcare provider if you:
- have an infection. See “What is the most important information I should know about Enbrel?” above.
- are being treated for an infection.
- think you have an infection.
- have symptoms of an infection such as fever, sweats or chills, cough or flu-like symptoms, shortness of breath, blood in your phlegm, weight loss, muscle aches, warm, red or painful areas on your skin, sores on your body, diarrhea or stomach pain, burning when you urinate or urinating more often than normal, and feel very tired.
- have any open cuts on your body.
- get a lot of infections or have infections that keep coming back.
- have diabetes, HIV, or a weak immune system. People with these conditions have a higher chance for infections.
- have TB, or have been in close contact with someone with TB.
- were born in, lived in, or traveled to countries where there is a risk for getting TB. Ask your healthcare provider if you are not sure.
- live, have lived in, or traveled to certain parts of the country (such as the Ohio and Mississippi River valleys, or the Southwest) where there is a greater risk for getting certain kinds of fungal infections (histoplasmosis, coccidioidomycosis, blastomycosis). These infections may happen or become more severe if you use Enbrel. Ask your healthcare provider if you do not know if you live or have lived in an area where these infections are common.
- have or have had hepatitis B.
Also, before starting Enbrel, tell your healthcare provider:
- About all the medicines you take including prescription and over-the-counter medicines, vitamins and herbal supplements including:
- Orencia (abatacept) or Kineret (anakinra). You have a higher chance for serious infections when taking Enbrel with Orencia or Kineret.
- Cyclophosphamide (Cytoxan). You may have a higher chance for getting certain cancers when taking Enbrel with cyclophosphamide.
- Anti-diabetic medicines. If you have diabetes and are taking medication to control your diabetes, your healthcare provider may decide you need less anti-diabetic medicine while taking Enbrel.
Keep a list of all your medications with you to show your healthcare provider and pharmacist each time you get a new medicine. Ask your healthcare provider if you are not sure if your medicine is one listed above.
Other important medical information you should tell your healthcare provider before starting Enbrel, includes if you:
- Have or had a nervous system problem such as multiple sclerosis or Guillain-Barré syndrome.
- Have or had heart failure.
- Are scheduled to have surgery.
- Have recently received or are scheduled to receive a vaccine.
- All vaccines should be brought up-to-date before starting Enbrel.
- People taking Enbrel should not receive live vaccines.
- Ask your healthcare provider if you are not sure if you received a live vaccine.
- Are allergic to rubber or latex.
- The needle covers on the Single-dose Prefilled Syringes, the needle covers within the white caps on the Single-dose Prefilled SureClick Autoinjectors, and within the purple caps of the Enbrel Mini Cartridges contain dry natural rubber.
- Have been around someone with varicella zoster (chicken pox).
- Are pregnant or plan to become pregnant. It is not known if Enbrel will harm your unborn baby. If you took Enbrel during pregnancy, talk to your healthcare provider prior to administration of live vaccines to your infant.
- Are breastfeeding or plan to breastfeed. Enbrel can pass into breast milk. Talk to your healthcare provider about the best way to feed your baby while taking Enbrel.
See the section “What are the possible side effects of Enbrel?” below for more information.
How should I take Enbrel?
- Enbrel is given as an injection under the skin (subcutaneous or SC).
- If your healthcare provider decides that you or a caregiver can give the injections of Enbrel at home, you or your caregiver should receive training on the right way to prepare and inject Enbrel. Do not try to inject Enbrel until you have been shown the right way by your healthcare provider or nurse.
- Enbrel is available in the forms listed below. Your healthcare provider will prescribe the type that is best for you.
- Single-dose Prefilled Syringe
- Single-dose Prefilled SureClick Autoinjector
- Multiple-dose Vial
- Enbrel Mini Single-dose Cartridge for use with the AutoTouch Reusable Autoinjector
- See the detailed Instructions for Use with this Medication Guide for instructions about the right way to store, prepare, and give your Enbrel injections at home.
- Your healthcare provider will tell you how often you should use Enbrel. Do not miss any doses of Enbrel. If you forget to use Enbrel, inject your dose as soon as you remember. Then, take your next dose at your regular(ly) scheduled time. In case you are not sure when to inject Enbrel, call your healthcare provider or pharmacist. Do not use Enbrel more often than as directed by your healthcare provider.
- Your child’s dose of Enbrel depends on his or her weight. Your child’s healthcare provider will tell you which form of Enbrel to use and how much to give your child.
What are the possible side effects of Enbrel?
Enbrel can cause serious side effects, including:
- See “What is the most important information I should know about Enbrel?”.
- Infections. Enbrel can make you more likely to get infections or make any infection that you have worse. Call your healthcare provider right away if you have any symptoms of an infection. See “What should I tell my healthcare provider before taking Enbrel?” for a list of symptoms of infection.
- Previous hepatitis B infection. If you have been previously infected with the hepatitis B virus (a virus that affects the liver), the virus can become active while you use Enbrel. Your healthcare provider may do a blood test before you start treatment with Enbrel and while you use Enbrel.
- Nervous system problems. Rarely, people who use TNF-blocker medicines have developed nervous system problems such as multiple sclerosis, seizures, or inflammation of the nerves of the eyes. Tell your healthcare provider right away if you get any of these symptoms:
- Blood problems. Low blood counts have been seen with other TNF-blocker medicines. Your body may not make enough of the blood cells that help fight infections or help stop bleeding. Symptoms include fever, bruising or bleeding very easily, or looking pale.
- Heart failure including new heart failure or worsening of heart failure you already have. New or worse heart failure can happen in people who use TNF-blocker medicines like Enbrel. If you have heart failure your condition should be watched closely while you take Enbrel. Call your healthcare provider right away if you get new or worsening symptoms of heart failure while taking Enbrel, such as:
- shortness of breath
- swelling of your lower legs or feet.
- Psoriasis. Some people using Enbrel developed new psoriasis or worsening of psoriasis they already had. Tell your healthcare provider if you develop red scaly patches or raised bumps that may be filled with pus. Your healthcare provider may decide to stop your treatment with Enbrel.
- Allergic reactions. Allergic reactions can happen to people who use TNF-blocker medicines. Call your healthcare provider right away if you have any symptoms of an allergic reaction. Symptoms of an allergic reaction include:
- a severe rash
- a swollen face
- trouble breathing.
- Autoimmune reactions, including:
- Lupus-like syndrome. Symptoms include a rash on your face and arms that gets worse in the sun. Tell your healthcare provider if you have this symptom. Symptoms may go away when you stop using Enbrel.
- Autoimmune hepatitis. Liver problems can happen in people who use TNF-blocker medicines, including Enbrel. These problems can lead to liver failure and death. Call your healthcare provider right away if you have any of these symptoms:
- feel very tired
- skin or eyes look yellow
- poor appetite
- vomiting
- pain on the right side of your stomach (abdomen).
Common side effects of Enbrel include:
- Injection site reactions such as redness, swelling, itching, or pain. These symptoms usually go away within 3 to 5 days. If you have pain, redness, or swelling around the injection site that does not go away or gets worse, call your healthcare provider.
- Upper respiratory infections (sinus infections).
These are not all the side effects with Enbrel. Tell your healthcare provider about any side effect that bothers you or does not go away.
Call your doctor for medical advice about side effects. You may report side effects to FDA at 1-800-FDA-1088.
General information about the safe and effective use of Enbrel
Medicines are sometimes prescribed for purposes not mentioned in a Medication Guide. Do not use Enbrel for a condition for which it was not prescribed. Do not give Enbrel to other people, even if they have the same condition. It may harm them.
This Medication Guide summarizes the most important information about Enbrel. If you would like more information, talk with your healthcare provider. You can ask your healthcare provider or pharmacist for information about Enbrel that was written for healthcare professionals.
Personalized help is available from Enbrel Support
- Here are just a few of the benefits available at no cost to you:
- Live nurses online or on the phone seven days a week, 8 AM to 11 PM (ET)
- Enbrel Support copay card and other financial help
- Medication and refill reminders by phone or email
- Needle disposal containers through the Sharps Mail-Back Program
- Sign up at 1-888-4ENBREL (1-888-436-2735) or EnbrelSupport.com.
How should I store Enbrel?
- Store Enbrel in the refrigerator between 36°F to 46°F (2°C to 8°C).
- Store Enbrel in the original carton to protect from light or damage.
- If needed, you may store the Enbrel Prefilled Syringe, SureClick Autoinjector, Enbrel Mini Cartridge, or the dose tray for the multi-dose vial at room temperature between 68°F to 77°F (20°C to 25°C) for up to 14 days. – Once Enbrel has reached room temperature, do not put it back in the refrigerator.
- Throw away Enbrel that has been stored at room temperature after 14 days.
- Mixed Enbrel multi-dose vial should be used right away or kept in the refrigerator between 36°F to 46°F (2°C to 8°C) for up to 14 days.
- Do not store Enbrel in extreme heat or cold such as in your vehicle’s glove box or trunk.
- Do not freeze.
- Do not shake.
- Keep Enbrel and all medicines out of the reach of children.
- If you have any questions about storage, contact your healthcare provider or call 1-888-4ENBREL (1-888-436-2735) for further instructions.
Storing your AutoTouch reusable autoinjector:
- Store AutoTouch at room temperature in a dry, safe place, such as a cabinet or drawer at 50°F to 104°F (10°C to 40°C).
- Use an alcohol wipe to clean the bottom (injection end) before and after each use.
- Do not store AutoTouch in the refrigerator with Enbrel Mini.
- Read your AutoTouch User Manual for additional care and storage information.
- Do not crush, burn, heat, or incinerate the battery as this may cause a risk of fire or explosion.
What are the ingredients in Enbrel?
Active Ingredient: etanercept
Single-dose Prefilled Syringe, Single-dose Prefilled SureClick Autoinjector, and Enbrel Mini Single-dose Cartridge:
Inactive Ingredients: L-arginine hydrochloride, sodium chloride, and sucroseMultiple-dose Vial:
Multiple-dose Vial:
Inactive Ingredients: mannitol, sucrose, tromethamine
Instructions for use
This section contains instructions for use for the:
- Enbrel SureClick autoinjector
- Enbrel SureClick 2.0 autoinjector
- Enbrel single-dose prefilled syringe
- Enbrel multiple-dose vial
- Enbrel AutoTouch reusable autoinjector with Enbrel Mini single-dose cartridge
Enbrel SureClick autoinjector
The Enbrel SureClick autoinjector is a single-dose prefilled autoinjector. It contains one 50 mg dose of Enbrel.
Your healthcare provider has prescribed Enbrel SureClick autoinjector for your injections. If your healthcare provider decides that you or a caregiver may be able to give your injections of Enbrel at home, you should receive training on the right way to prepare and inject Enbrel. Do not try to inject yourself until you have been shown the right way to give the injections by your healthcare provider.
Please read all of the instructions before using Enbrel SureClick autoinjector. Call your healthcare provider if you or your caregiver has any questions about the right way to inject Enbrel.
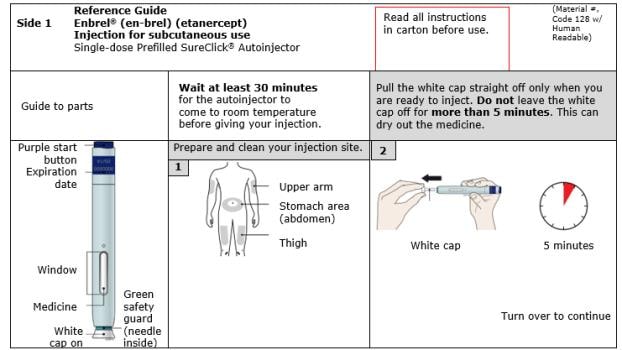
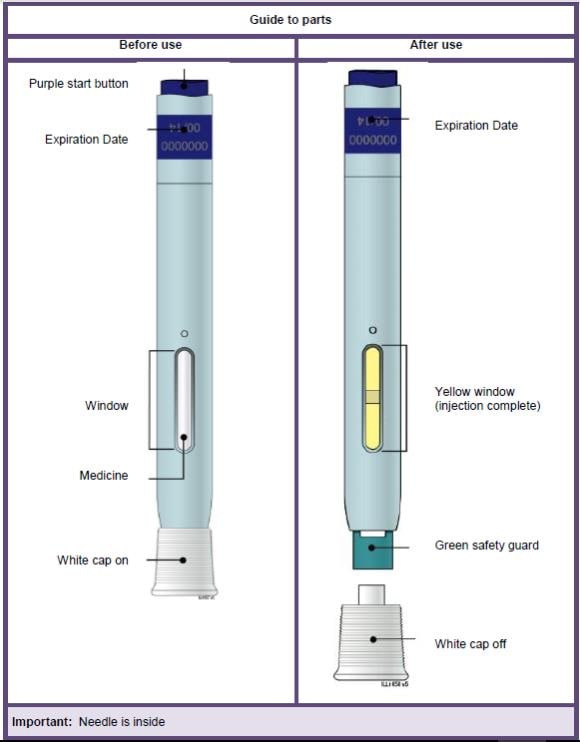
| Guide to parts | |
| Before use | After use |
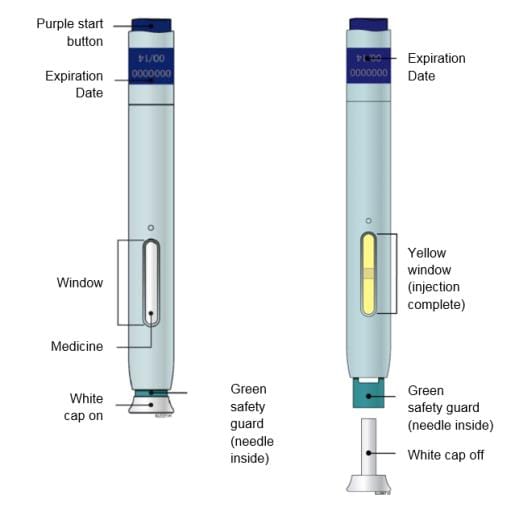 |
|
Important: Needle is inside the green safety guard
Using your Enbrel SureClick autoinjector
- It is important that you do not try to give the injection unless you or your caregiver has received training from your healthcare provider.
- Do not use an Enbrel SureClick autoinjector after the expiration date on the label.
- Do not shake the Enbrel SureClick autoinjector.
- Do not remove the white cap from the Enbrel SureClick autoinjector until you are ready to inject.
- Do not use an Enbrel SureClick autoinjector if it has been dropped on a hard surface. Part of the Enbrel SureClick autoinjector may be broken even if you cannot see the break. Use a new Enbrel SureClick autoinjector, and call 1-888-4ENBREL (1-888-436-2735).
- The white needle cap on the Enbrel SureClick autoinjector contains dry natural rubber, which is made from latex. Tell your healthcare provider if you are allergic to latex.
- Children must weigh at least 138 pounds to use the Enbrel SureClick autoinjector. Children who weigh less than 138 pounds should use a different form of Enbrel.
If you have any questions about usage, contact your healthcare provider, visit www.enbrel.com or call 1-888-4ENBREL (1-888-436-2735).
STEP 1: Prepare
A. Remove one Enbrel SureClick autoinjector from the package.
Carefully lift the autoinjector straight up out of the box.
Put the original package with any unused autoinjectors back in the refrigerator.
Leave the autoinjector at room temperature for at least 30 minutes before injecting.
- Do not put the autoinjector back in the refrigerator once it has reached room temperature.
- Do not try to warm the autoinjector by using a heat source such as hot water or microwave.
- Do not shake the autoinjector.
- Do not remove the white cap from the autoinjector yet.
B. Inspect the Enbrel SureClick autoinjector.
Make sure the medicine in the window is clear and colorless.
It is okay if you see small white particles in the medicine.
- Do not use the autoinjector if:
- The medicine is cloudy or discolored or contains large lumps, flakes, or colored particles.
- Any part appears cracked or broken.
- The white cap is missing or not securely attached.
- The expiration date printed on the label has passed.
In all cases, use a new autoinjector, and call 1-888-4ENBREL (1-888-436-2735).
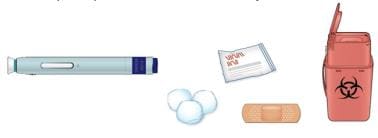
C. Gather all materials needed for your injection.
Wash your hands thoroughly with soap and water.
On a clean, well-lit work surface, place the:
- New autoinjector
- Alcohol wipes
- Cotton ball or gauze pad
- Adhesive bandage
- Sharps disposal container. See “STEP 4: Finish”
D. Prepare and clean your injection site.
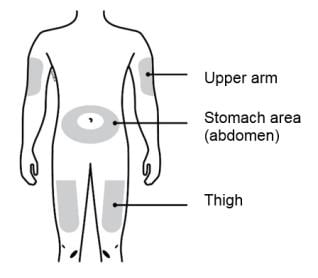
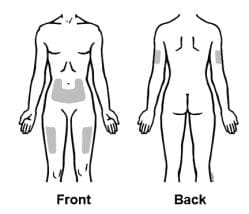
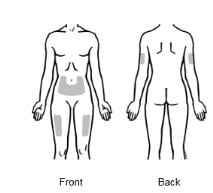
Only use these injection sites:
- Your thigh
- Stomach area (abdomen), except for a two-inch area right around your navel (belly button)
- Outer area of upper arm (only if someone else is giving you the injection)
Clean your injection site with an alcohol wipe. Let your skin dry.
- Do not touch this area again before injecting.
- Choose a different site each time you give yourself an injection. If you need to use the same injection site, just make sure it is not the same spot on that site you used last time.
- Do not inject into areas where the skin is tender, bruised, red, or hard. Avoid injecting into areas with scars or stretch marks.
- If you have psoriasis, you should avoid injecting directly into raised, thick, red, or scaly skin patch or lesion.
 |
STEP 2: Get ready
E. Pull white cap straight off, only when you are ready to inject. Do not leave the white cap off for more than five minutes. This can dry out the medicine.
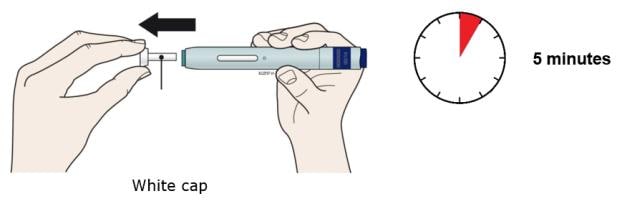
It is normal to see a drop of liquid at the end of the needle or green safety guard.
- Do not twist or bend the white cap.
- Do not put the white cap back onto the autoinjector.
- Do not put fingers into the green safety guard.
- Do not remove the white cap from the autoinjector until you are ready to inject.
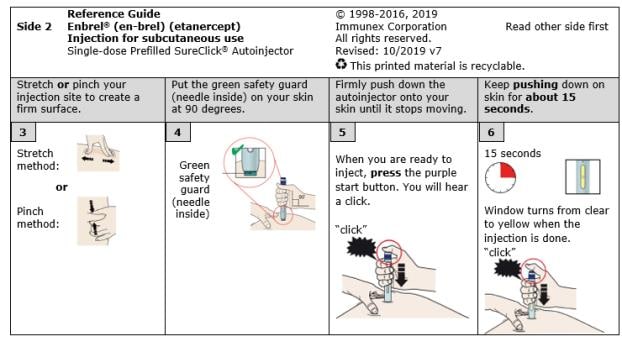
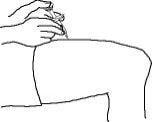
F. Create a firm surface at the selected injection site (thigh, stomach, or outer areas of the upper arm), by using either the Stretch method or the Pinch method.
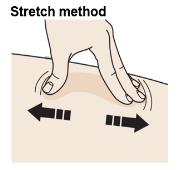
Stretch skin firmly by moving your thumb and fingers in opposite directions, creating an area about two inches wide.
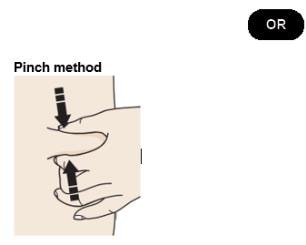
Pinch skin firmly between your thumb and fingers, creating an area about two inches wide.
Important: Keep the skin stretched or pinched while injecting.
STEP 3: Inject
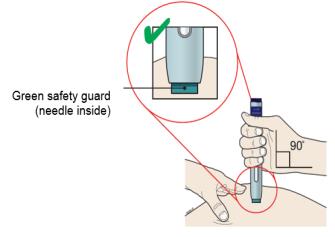
G. Keep holding the stretched or pinched skin. With the white cap off, put the green safety guard on your skin at 90 degrees. The needle is inside the green safety guard. Do not touch the purple start button yet.
 |
H. Firmly push the autoinjector down onto skin until it stops moving.
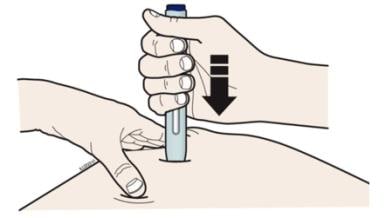
Important: You must push all the way down but do not touch purple start button until you are ready to inject.
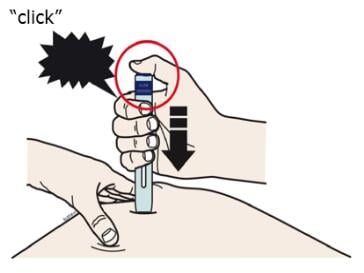
I. When you are ready to inject, press the purple start button.
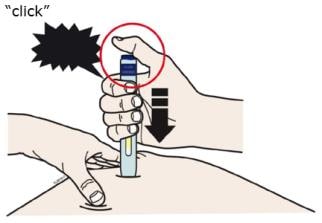
J. Keep pushing down on your skin. Then lift your thumb while still holding the autoinjector on your skin. Your injection could take about 15 seconds.
 |
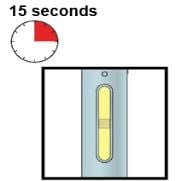
Window turns from clear to yellow when the injection is done. You may hear a second click. |
 |
Note: After you remove the autoinjector from your skin, the needle will be automatically covered. |
Important: When you remove the autoinjector, if the window has not turned yellow, or if it looks like the medicine is still injecting, this means you have not received a full dose. Call your healthcare provider immediately.
STEP 4: Finish
K. Discard the used autoinjector and the white cap.
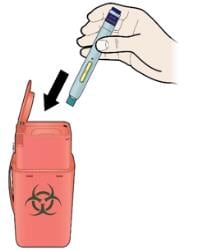
- Put the used SureClick autoinjector in a FDA-cleared sharps disposal container right away after use. Do not throw away (dispose of) the SureClick autoinjector in your household trash.
- If you do not have a FDA-cleared sharps disposal container, you may use a household container that is:
- made of a heavy-duty plastic
- can be closed with a tight-fitting, puncture-resistant lid, without sharps being able to come out
- upright and stable during use
- leak-resistant
- properly labeled to warn of hazardous waste inside the container.
- When your sharps disposal container is almost full, you will need to follow your community guidelines for the right way to dispose of your sharps disposal container. There may be state or local laws about how you should throw away used needles and syringes. For more information about safe sharps disposal, and for specific information about sharps disposal in the state that you live in, go to the FDA’s website at: http://www.fda.gov/safesharpsdisposal
- Do not reuse the autoinjector.
- Do not recycle the autoinjector or sharps disposal container or throw them into household trash.
Important: Always keep the sharps disposal container out of the reach of children.
L. Examine the injection site.
If there is blood, press a cotton ball or gauze pad on your injection site. Do not rub the injection site. Apply an adhesive bandage if needed.
Please see the Medication Guide for Enbrel above and Prescribing Information.
Commonly asked questions
1. What will happen if I press the purple start button before I am ready to do the injection on my skin?
Even when you press the purple start button, the injection will only happen when the green safety guard is also pushed into the autoinjector.
2. Can I move the autoinjector around on my skin while I am choosing an injection site?
It is okay to move the autoinjector around on the injection site as long as you do not press the purple start button. However, if you press the purple start button and the green safety guard is pushed into the autoinjector, the injection will begin.
3. Can I release the purple start button after I start my injection?
You can release the purple start button, but continue to hold the autoinjector firmly against your skin during the injection.
4. Will the purple start button pop up after I release my thumb?
The purple start button may not pop up after you release your thumb if you held your thumb down during the injection. This is okay.
5. What do I do if I did not hear a click after pushing the device down on my skin for 15 seconds?
If you did not hear a click, you can confirm a complete injection by checking that the window has turned yellow.
6. Whom do I contact if I need help with the autoinjector or my injection?
If you have any questions about the autoinjector, its storage, or about your injection, contact your healthcare provider or visit www.enbrel.com or call 1-888-4ENBREL (1-888-436-2735) for help.
Enbrel SureClick 2.0 autoinjector
Before you use an Enbrel SureClick 2.0 autoinjector, read this important information.
STEP 1: Prepare
This Enbrel SureClick 2.0 autoinjector has an optional wireless feature included in the white cap. This wireless feature will not affect your injection steps. The white caps on the Enbrel SureClick 2.0 autoinjectors have a Bluetooth wireless feature that can keep track of your Enbrel injections. This feature is optional and does not affect your injection steps or your Enbrel medicine. You can inject without using this feature. To use this feature, download and set up the Embrace app on your mobile device. After Embrace is set up, follow all injection steps as you normally would in this Instructions for Use. Please note: Pulling the white cap off your autoinjector automatically sends a signal to Embrace and keeps track of your Enbrel injection. For questions about the Embrace app and this feature, call 1-888-4-ENBREL. Remember, this feature is optional and you can inject without using the Embrace app. Always follow all steps found in this Instructions for Use.
Follow the Instructions for Use as for Enbrel SureClick autoinjector above, but remember that the white cap contains a Bluetooth wireless feature. Keep the white cap dry.
Important information required by the Federal Communications Commission (FCC)
FCCID: 2AGZ4SC15
The Enbrel SureClick 2.0 white cap contains a Bluetooth wireless feature. This white cap complies with Part 15 of the FCC Rules.
Operation is subject to the following two conditions:
1. This white cap may not cause harmful interference.
2. This white cap must accept any interference received, including interference that may cause undesirable operation.
Modification to this white cap shall not be made without the written consent of Amgen.
Unauthorized modification may void the authority granted under FCC rules permitting the operation of this white cap.
This white cap has been tested and found to comply with the limits for a Class B digital device, pursuant to part 15 of the FCC Rules. These limits are designed to provide reasonable protection against harmful interference in a residential installation. This white cap generates, uses, and can radiate radio frequency energy and, if not installed and used in accordance with the instructions, may cause harmful interference to radio communications. However, there is no guarantee that interference will not occur in a particular installation. If this white cap does cause harmful interference to radio or television reception, which can be determined by moving the white cap far away and back, the user is encouraged to try to correct the interference by one or more of the following measures:
- Reorient or relocate the receiving antenna.
- Increase the separation between the white cap and interference receiver.
- Consult the dealer or an experienced radio/TV technician for help.
The Bluetooth word mark and logos are registered trademarks owned by Bluetooth SIG Inc. and any use of such marks by Amgen is under license. Other trademarks and trade names are those of their respective owners.
Enbrel single-dose prefilled syringe
There are 2 types of Enbrel single-dose prefilled syringes:How do I prepare and give an injection with Enbrel Single-dose Prefilled Syringe?
- The 50 mg/mL single-dose prefilled syringe that contains one 50 mg dose of Enbrel.
- The 25 mg/0.5 mL single-dose prefilled syringe that contains one 25 mg dose of Enbrel.
Your healthcare provider will tell you which one to use.
A 50 mg dose can be given as one injection using a 50 mg/mL single-dose prefilled syringe or as two injections using 25 mg/0.5 mL single-dose prefilled syringes. Your healthcare provider will tell you whether the two injections with 25 mg/0.5 mL single-dose prefilled syringes should be given on the same day once a week or on two different days (3 or 4 days apart) in the same week.
Children must weigh at least 138 pounds to use the Enbrel 50 mg/mL single-dose prefilled syringe. Children who weigh less than 138 pounds should use a different form of Enbrel. The Enbrel 25 mg/0.5 mL single-dose prefilled syringe should not be used in pediatric patients weighing less than 68 pounds.
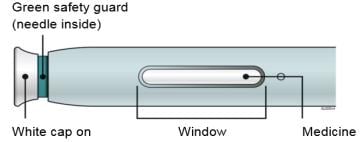
Important: The needle cover on the single-dose prefilled syringe is composed of dry natural rubber, which is made from latex. Tell your healthcare provider if you are allergic to latex.
STEP 1: Setting Up for an Injection
1. Select a clean, well-lit, flat work surface, such as a table.
2. Take the Enbrel carton containing the prefilled syringes out of the refrigerator and place it on your flat work surface. Remove one prefilled syringe and place it on your work surface. Carefully lift the prefilled syringe straight up out of the box. Do not shake the prefilled syringe of Enbrel. Place the carton containing any remaining prefilled syringes back into the refrigerator at 36ºF to 46ºF (2ºC to 8ºC).
3. Check the expiration date on the prefilled syringe. If the expiration date has passed, do not use the prefilled syringe and contact your pharmacist or call 1-888-4ENBREL (1-888-436-2735) for assistance.
4. Do not use the prefilled syringe if the needle cover is missing or not securely attached. Call 1-888-4ENBREL (1-888-436-2735).
5. For a more comfortable injection, leave the prefilled syringe at room temperature for about 15 to 30 minutes before injecting. Do not remove the needle cover while allowing it to reach room temperature. Do not warm Enbrel in any other way (for example, do not warm it in a microwave or in hot water).
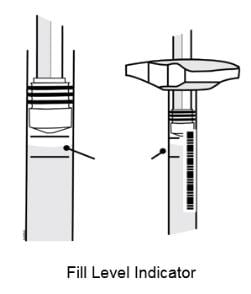
6. Hold the prefilled syringe with the covered needle pointing down. If bubbles are seen in the syringe, very gently tap the prefilled syringe to allow any bubbles to rise to the top of the syringe. Turn the syringe so that the purple horizontal lines on the barrel are directly facing you. Check to see if the amount of liquid in the syringe falls between the purple lines. The top of the liquid may be curved. If the syringe does not have the right amount of liquid, do not use that syringe. Contact your pharmacist or call 1-888-4ENBREL (1-888-436-2735) for assistance.
 |
7. Assemble the additional supplies you will need for your injection. These include an alcohol swab, a cotton ball or gauze, and a sharps disposal container (see “STEP 4: Disposing of Supplies”).
8. Wash your hands with soap and warm water.
9. Make sure the solution in the prefilled syringe is clear and colorless. You may notice small white particles in the solution. These particles are formed from Enbrel and this is acceptable. However, do not inject the solution if it is cloudy or discolored, or contains large or colored particles, call 1-888-4ENBREL (1-888-436-2735).
STEP 2: Choosing and Preparing an Injection Site
1. Recommended injection sites for Enbrel using a prefilled syringe include:
- the front of the middle thigh
- the stomach area (abdomen), except for the 2-inch area right around the navel (belly button)
- the outer area of the upper arm (only if someone else is giving you the injection)
 |
2. Rotate the site for each injection. Do not inject into areas where the skin is tender, bruised, red, or hard. Avoid areas with scars or stretch marks.
3. If you have psoriasis, you should not inject directly into any raised, thick, red, or scaly skin patches or lesions.
4. To prepare the area of skin where Enbrel is to be injected, wipe the injection site with an alcohol swab. Do not touch this area again before giving the injection.
STEP 3: Injecting Enbrel Using a Prefilled Syringe
Do not remove the needle cover from the prefilled syringe until you are ready to inject.
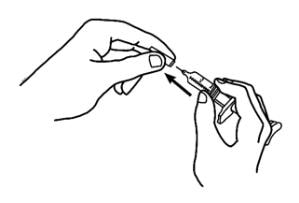
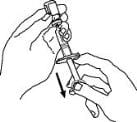
1. Pick up the prefilled syringe from your flat work surface. Hold the barrel of the prefilled syringe with one hand and pull the needle cover straight off, only when you are ready to inject. Do not leave the needle cover off for more than five minutes. This can dry out the medicine.
 |
 |
To avoid damaging the needle, do not twist or bend the needle cover while you are removing it, and do not try to put the needle cover back onto the prefilled syringe.
When you remove the needle cover, there may be a drop of liquid at the end of the needle; this is normal. Do not touch the needle or allow it to touch any surface. Do not touch or bump the plunger. Doing so could cause the liquid to leak out.
2. Holding the syringe with the needle pointing up, check the syringe for air bubbles. If there are bubbles, gently tap the syringe with your finger until the air bubbles rise to the top of the syringe. Slowly push the plunger up to force the air bubbles out of the syringe.
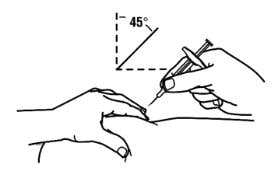
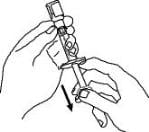
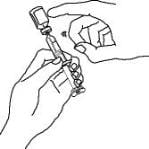
3. Holding the syringe in one hand like a pencil, use the other hand to gently pinch a fold of skin at the cleaned injection site and hold it firmly.
4. With a quick and “dart-like” motion, insert the needle at a 45-degree angle into the skin.
 |
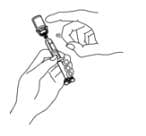
5. When the needle is completely inserted into the skin, let go of the skin that you are holding. With your free hand, hold the syringe near its base to stabilize it. Then push the plunger to inject all of the Enbrel solution at a slow, steady rate.
6. When the syringe is empty, pull the needle out of the skin, being careful to keep it at the same angle as inserted. There may be a little bleeding at the injection site. You can press a cotton ball or gauze over the injection site for 10 seconds. Do not rub the injection site. If needed, you may cover the injection site with a bandage.
STEP 4: Disposing of Supplies
The syringe should never be reused. Never recap a needle.
- Put the used prefilled syringes in a FDA-cleared sharps disposal container right away after use. Do not throw away (dispose of) prefilled syringes in your household trash.
- If you do not have a FDA-cleared sharps disposal container, you may use a household container that is:
- made of a heavy-duty plastic
- can be closed with a tight-fitting, puncture-resistant lid, without sharps being able to come out
- upright and stable during use
- leak-resistant
- properly labeled to warn of hazardous waste inside the container.
- When your sharps disposal container is almost full, you will need to follow your community guidelines for the right way to dispose of your sharps disposal container. There may be state or local laws about how you should throw away used syringes and needles. For more information about safe sharps disposal, and for specific information about sharps disposal in the state that you live in, go to the FDA’s website at: http://www.fda.gov/safesharpsdisposal
- Do not reuse the syringe.
- Do not recycle the syringe or sharps disposal container or throw them into household trash.
Important: Always keep the sharps disposal container out of the reach of children.
A healthcare provider familiar with Enbrel should answer all questions. Call 1-888-4ENBREL (1-888-436-2735) or visit www.enbrel.com for more information about Enbrel.
Enbrel multiple-dose vial
How do I prepare and give an injection with Enbrel multiple-dose vial?
A multiple-dose vial contains 25 mg of Enbrel.
STEP 1: Setting Up for an Injection
1. Select a clean, well-lit, flat work surface, such as a table.
2. Take the Enbrel dose tray out of the refrigerator and place it on your flat work surface.
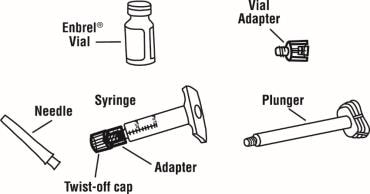
3. Check the expiration date on the dose tray. If the expiration date has passed, do not use the dose tray. Also check to make sure the dose tray has 5 items as pictured below:
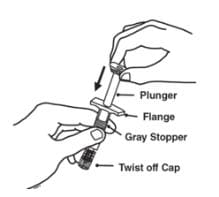
- One prefilled diluent syringe containing 1 mL of diluent (liquid) with attached adapter and twist-off cap
- One plunger
- One Enbrel vial
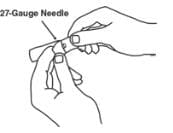
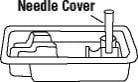
- One 27-gauge ½ inch needle in hard plastic cover
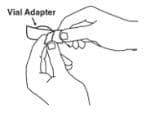
- One vial adapter
If the expiration date has passed, the five items are not included in the dose tray or if any item looks damaged, contact your pharmacist or call 1-888-4ENBREL (1-888-436-2735) for assistance.
4. For a more comfortable injection, leave the dose tray at room temperature for about 15 to 30 minutes before injecting.
5. Wash your hands with soap and warm water.
6. Peel the paper seal off the dose tray and remove all items.
7. Inspect the volume of diluent in the syringe with the twist-off cap pointing down. Use the unit markings on the side of the syringe to make sure there is at least 1 mL of liquid in the syringe. If the level of liquid is below the 1 mL mark, do not use. Contact your pharmacist or call 1-888-4ENBREL (1-888-436-2735) for assistance.
8. Do not use the syringe if the twist-off cap is missing or not securely attached. Call 1-888-4ENBREL (1-888-436-2735).
9. Two alcohol swabs should be available for the preparation and injection of Enbrel. Alcohol swabs can be found at your local drug store.
STEP 2: Preparing the Enbrel Solution
There are two methods for preparing the Enbrel solution. For some children, one vial of Enbrel solution can be used for more than one dose. The free-hand method should be used for children on Enbrel who are using one vial of Enbrel solution for more than one dose. You should not use the vial adapter method if you will be using the vial more than once. Ask your healthcare provider if you have questions about which method to use.
- The Vial Adapter Method
Adults and larger children on Enbrel may use the vial adapter device to assist with mixing the powder with the liquid and withdrawing Enbrel, and then use a 27-gauge needle to inject the dose. This method should not be used for children using multiple doses from the same vial of Enbrel. The instructions for using the vial adapter method are in STEP 2A.
- The Free-Hand Method
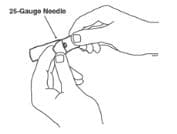
In the free-hand method, a 25-gauge needle is used to assist with mixing the powder with the liquid and withdrawing Enbrel, and a 27-gauge needle is used to inject the dose. Obtain 25-gauge needles from your healthcare provider. Instructions for using the free-hand method are in STEP 2B.
The instructions for preparing additional doses from the same vial of Enbrel solution are in Step 3. For each additional dose, you will need two new needles (one 25-gauge needle to withdraw the solution and one 27-gauge needle for injection) and one new empty syringe (1 mL). Never reuse a syringe or needle.
If you are using the vial of Enbrel for more than one dose, you should write the date you mixed the powder and liquid in the area marked “Mixing Date:” on the sticker supplied with these instructions, and attach the sticker to the Enbrel vial.
After you have withdrawn the dose of Enbrel that you need, store the Enbrel vial (in the dose tray) in the refrigerator at 36º to 46ºF (2º to 8ºC) as soon as possible, but always within 4 hours of mixing the solution. Do not freeze. If you have any questions about storage, contact your healthcare provider or call 1-888-4ENBREL (1-888-436-2735) for further instructions.
The Enbrel solution must be used within 14 days of the mixing date. You should discard the Enbrel vial and any remaining solution if it is not used within 14 days. Do not mix any remaining liquid in one vial of Enbrel solution with another.
STEP 2A: Vial Adapter Method
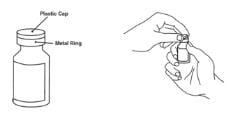
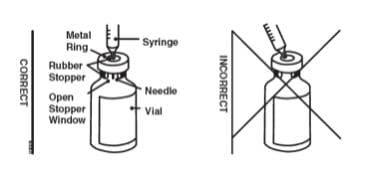
1. Remove the pink plastic cap from the Enbrel vial. Do not remove the gray stopper or silver metal ring around the top of the Enbrel vial.
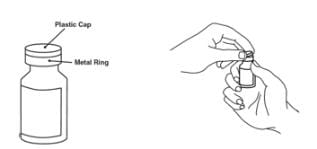
2. Place the Enbrel vial on your flat work surface or turn your dose tray upside down and place your Enbrel vial in the round space marked “V”. Use one alcohol swab to clean the gray stopper on the Enbrel vial. Do not touch the gray stopper with your hands.
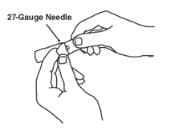
3. Open the wrapper that contains the 27-gauge needle by peeling apart the tabs and set the needle aside for later use.
4. Open the wrapper that contains the vial adapter by peeling apart the tabs and set the vial adapter aside for later use. Do not touch the vial adapter’s twist-on end or the spike inside.
5. Slide the plunger into the flange end of the syringe.
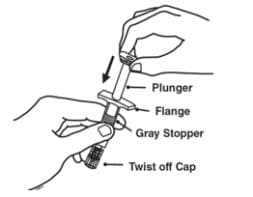
6. Attach the plunger to the gray rubber stopper in the syringe by turning the plunger clockwise until you feel a slight resistance.

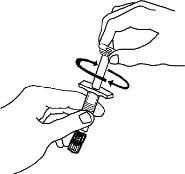
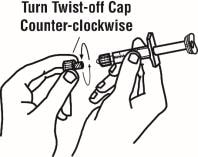
7. Remove the twist-off cap from the prefilled diluent syringe by turning counter-clockwise. Do not bump or touch the plunger. Doing so could cause the liquid to leak out. You may see a drop of liquid when removing the cap. This is normal. Place the cap on your flat work surface. Do not touch the syringe tip.
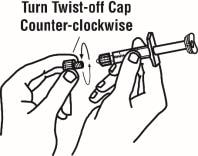
8. Once the twist-off cap is removed, pick up the vial adapter with your free-hand. Twist the vial adapter onto the syringe, turning clockwise until you feel a slight resistance. Do not over-tighten.
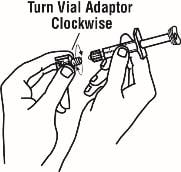
9. Hold the Enbrel vial upright on your flat work surface. Grasp the sides of the vial adapter and place it over the top of the Enbrel vial. Do not bump or touch the plunger. Doing so could cause the liquid to leak out. Insert the vial adapter into the gray stopper on the Enbrel vial. The plastic spike inside the vial adapter should puncture the gray stopper. The vial adapter should fit snugly.
10. Hold the Enbrel vial upright on your flat work surface and push the plunger down until all the liquid from the syringe is in the Enbrel vial. You may see foaming (bubbles) in the vial. This is normal.

11. Gently swirl the Enbrel vial in a circular motion to dissolve the powder. If you used the dose tray to hold your Enbrel vial, take the vial (with the vial adapter and syringe still attached) out of the dose tray, and gently swirl the vial in a circular motion to dissolve the powder.

Do not shake. Wait until all the powder dissolves (usually less than 10 minutes). The solution should be clear and colorless. After the powder has completely dissolved, foam (bubbles) may still be present. This is normal. Do not inject the solution if it is discolored, contains lumps, flakes, or particles. If all the powder in the Enbrel vial is not dissolved or there are particles present after 10 minutes, call 1-888-4ENBREL (1-888-436-2735).
12. Turn the Enbrel vial upside down. Hold the syringe at eye level and slowly pull the plunger down to the unit markings on the side of the syringe that correspond with your/your child’s dose. For adult patients, remove the entire volume (1 mL), unless otherwise instructed by your healthcare provider. Be careful not to pull the plunger completely out of the syringe. Some white foam may remain in the Enbrel vial. This is normal.
13. Check for air bubbles in the syringe. Gently tap the syringe to make any air bubbles rise to the top of the syringe. Slowly push the plunger up to remove the air bubbles. If you push solution back into the vial, slowly pull back on the plunger to again draw the correct amount of solution back into the syringe.
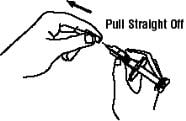
14. Remove the syringe from the vial adapter, by holding the vial adapter with one hand and turning the syringe counter-clockwise with your other hand. Do not touch or bump the plunger. Place the Enbrel vial with the vial adapter on your flat work surface.
15. Continue to hold the barrel of the syringe. With your free-hand, twist the 27-gauge needle onto the tip of the syringe until it fits snugly. Do not remove the needle cover from the syringe. Place the syringe on your flat work surface until you are ready to inject Enbrel.
Go to STEP 4: Choosing and Preparing an Injection Site.
STEP 2B: Free-Hand Method
If you are preparing a dose from an Enbrel vial that was previously used, go to STEP 3: Preparing Additional Doses from a Single Enbrel Vial.
1. Remove the pink plastic cap from the Enbrel vial. Do not remove the gray stopper or silver metal ring around the top of the Enbrel vial. Write the date you mix the powder and solution on the supplied “Mixing Date:” sticker and attach it to the Enbrel vial.
2. Place the Enbrel vial on your flat work surface. Use one alcohol swab to clean the gray stopper on the Enbrel vial. Do not touch the gray stopper with your hands.
3. Open the wrapper that contains the 25-gauge needle by peeling apart the tabs and set the needle aside for later use. The 25-gauge needle will be used to mix the liquid with the powder and for withdrawing Enbrel from the vial.
4. Slide the plunger into the flange end of the syringe.
5. Attach the plunger to the gray rubber stopper in the syringe by turning the plunger clockwise until you feel a slight resistance.
6. Remove the twist-off cap from the prefilled diluent syringe by turning counter-clockwise. Do not touch or bump the plunger. Doing so could cause the liquid to leak out. You may see a drop of liquid when removing the cap. This is normal. Place the cap on your flat work surface. Do not touch the syringe tip.
7. Continue to hold the barrel of the syringe. With your free-hand, twist the 25-gauge needle onto the tip of the syringe until it fits snugly. Place the syringe on your flat work surface.

8. Open the wrapper that contains the 27-gauge needle by peeling apart the tabs and set the needle aside for later use. The 27-gauge needle will be used to inject the dose.
9. Pick up the syringe from your flat work surface. Hold the barrel of the syringe with one hand, and pull the needle cover straight off. To avoid damaging the needle, do not twist or bend the needle cover while you are removing it. Do not touch the needle or allow it to touch any surface. Do not touch or bump the plunger. Doing so could cause the liquid to leak out.
10. Place the needle cover (open side up) in the round space marked “N” in the Enbrel dose tray.
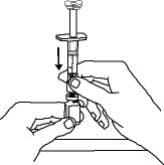
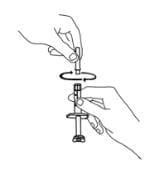
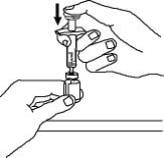
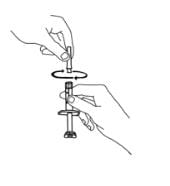
11. Place the Enbrel vial on your flat work surface. Hold the syringe with the needle facing up, and gently pull back on the plunger to pull a small amount of air into the syringe. Then, insert the needle straight down through the center ring of the gray stopper (see illustrations). You should feel a slight resistance and then a “pop” as the needle goes through the center of the stopper. Look for the needle tip inside the open stopper window. If the needle is not correctly lined up with the center of the stopper, you will feel constant resistance as it goes through the stopper and no “pop”. The needle may enter at an angle and bend, break or prevent you from adding diluent into the Enbrel vial.
12. Push the plunger down very slowly until all liquid from the syringe is in the Enbrel vial. Adding the liquid too fast will cause foaming (bubbles).
13. Leave the syringe in place. Gently swirl the Enbrel vial in a circular motion to dissolve the powder.
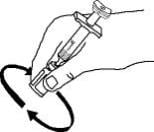
Do not shake. Wait until all the powder dissolves (usually less than 10 minutes). The solution should be clear and colorless. After the powder has completely dissolved, foam (bubbles) may still be present. This is normal. Do not inject the solution if it is discolored, contains lumps, flakes, or particles. If all the powder in the Enbrel vial is not dissolved or there are particles present after 10 minutes, call 1-888-4ENBREL (1-888-436-2735).
14. With the needle in the Enbrel vial, turn the vial upside down. Hold the syringe at eye level and slowly pull the plunger down to the unit markings on the side of the syringe that correspond with the correct dose. Make sure to keep the tip of the needle in the solution. Some white foam may remain in the Enbrel vial. This is normal.
15. With the needle still inserted in the Enbrel vial, check for air bubbles in the syringe. Gently tap the syringe to make any air bubbles rise to the top of the syringe. Slowly push the plunger up to remove the air bubbles. If you push solution back into the vial, slowly pull back on the plunger to draw the correct amount of solution back into the syringe.
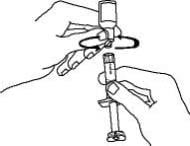
16. Remove the syringe and needle from the Enbrel vial. Keep the needle attached to the syringe and insert the 25-gauge needle straight down into the needle cover in the Enbrel dose tray.
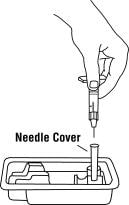
You should hear a “snap” when the needle is secure in the needle cover. Once the needle is secure in the needle cover, untwist the 25-gauge needle from the syringe and dispose of the needle in your sharps disposal container (see “STEP 6: Disposing of Supplies”).
17. Twist the 27-gauge needle onto the syringe until it fits snugly. Do not remove the needle cover from the syringe. Place the syringe on your flat work surface until you are ready to inject Enbrel.
18. If there is enough solution left in the Enbrel vial for another dose, write the date you mixed the powder and liquid in the area marked “Mixing Date:” on the sticker supplied with these instructions, and attach the sticker to the Enbrel vial. Refrigerate the reconstituted (mixed) Enbrel vial (in the dose tray) after mixing. Prepare additional doses from the Enbrel vial as described in STEP 3. Otherwise, throw away (discard) the Enbrel vial and any remaining solution.
Go to STEP 4: Choosing and Preparing an Injection Site.
STEP 3: Preparing Additional Doses from a Single Enbrel Vial
- Select a clean, well-lit, flat work surface, such as a table.
- Do not reuse the needles and syringes supplied with Enbrel dose tray. You will need new needles and syringes for each additional dose. Your healthcare provider will tell you what type of syringes (1 mL) and needles (25-gauge and 27-gauge) to use. Place the sterile syringe with a 25-gauge needle (for withdrawing Enbrel), a 27-gauge needle (for injecting Enbrel) and two alcohol swabs on your flat work surface.
- Take the vial of Enbrel solution that is stored in the dose tray out of the refrigerator and place it on your flat work surface.
- Check the mixing date you wrote on the sticker on the Enbrel vial. Discard the Enbrel vial if more than 14 days have passed since the Enbrel solution was mixed.
- Wash your hands with soap and warm water.
- Use one alcohol swab to clean the gray stopper on the Enbrel vial. Do not touch the stopper with your hands.
- If the syringe and the 25-gauge needle are not pre-assembled, assemble them as instructed by your healthcare provider.
- Open the wrapper that contains the 27-gauge needle by peeling apart the tabs and set the needle aside for later use. The 27-gauge needle will be used to inject the dose of Enbrel.
- Hold the syringe and pull the needle cover straight off. To avoid damaging the needle, do not twist or bend the needle cover while you are removing it. Do not touch the needle or allow it to touch any surface. Place the needle cover (open side up) in the round space marked “N” in the Enbrel dose tray.
- Place the Enbrel vial on your flat work surface. Hold the syringe with the needle facing up, and gently pull back the plunger to pull a small amount of air into the syringe. Then, insert the 25-gauge needle straight down through the center ring of the gray stopper. You should feel a slight resistance and then a “pop” as the needle goes through the center of the stopper. Look for the needle tip inside the open stopper window. If the needle is not correctly lined up with the center of the stopper, you will feel constant resistance as it goes through the stopper and no “pop”. The needle may enter at an angle and bend, break, or prevent proper withdrawal of Enbrel solution from the vial.
- Keep the needle in the Enbrel vial and turn the vial upside down. Hold the syringe at eye level, and slowly pull the plunger down to the unit markings on the syringe that correspond to your child’s dose. As the amount of solution in the Enbrel vial drops, you may need to pull the needle back just enough to keep the tip of the needle in the solution.
- With the needle still inserted in the Enbrel vial, check for air bubbles in the syringe. Gently tap the syringe to make any air bubbles rise to the top of the syringe. Slowly push the plunger up to remove the air bubbles. If you push solution back into the Enbrel vial, slowly pull back on the plunger to again draw the correct amount of solution back into the syringe.
- Remove the syringe and needle from the Enbrel vial. Keep the needle attached to the syringe and insert the 25-gauge needle straight down into the needle cover in the Enbrel dose tray. You should hear a “snap” when the needle is secure in the needle cover. Once the needle is secure in the needle cover, remove the 25-gauge needle from the syringe and dispose of the needle in a sharps disposal container (see “STEP 6: Disposing of Supplies”).
- Attach the 27-gauge needle onto the tip of the syringe until it fits snugly. Do not remove the needle cover from the syringe. Place the syringe on your flat work surface until you are ready to inject Enbrel.
STEP 4: Choosing and Preparing an Injection Site
1. The 3 recommended injection sites for Enbrel include:
- the front of the middle thighs
- the stomach area (abdomen), except for the 2-inch area right around the navel (belly button)
- the outer area of the upper arms (only if someone else is giving you the injection)
2. Rotate the site for each injection. Do not inject into areas where the skin is tender, bruised, red, or hard. Avoid areas with scars or stretch marks.
3. If you have psoriasis, you should not inject directly into any raised, thick, red, or scaly skin patches or lesions.
4. To prepare the area of skin where Enbrel is to be injected, wipe the injection site with a new alcohol swab. Do not touch this area again before giving the injection.
STEP 5: Injecting the Enbrel Solution
Do not remove the needle cover from the syringe until you are ready to inject.
1. Pick up the syringe from your flat work surface. Hold the barrel of the syringe with one hand and pull the needle cover straight off. To avoid damaging the needle, do not twist or bend the needle cover while you are removing it, and do not try to put the needle cover back onto the syringe. When you remove the needle cover, there may be a drop of liquid at the end of the needle. This is normal. Do not touch the needle or allow it to touch any surface. Do not touch or bump the plunger. Doing so could cause the liquid to leak out.
2. With one hand, gently pinch the cleaned area of skin and hold it firmly. With the other hand, hold the syringe (like a pencil) at a 45-degree angle to the skin.

3. With a quick and “dart-like” motion, insert the needle at a 45-degree angle into the skin.
4. When the needle is completely inserted into the skin, let go of the skin that you are holding. With your free-hand, hold the syringe near its base to stabilize it. Then push the plunger to inject all of the Enbrel solution at a slow, steady rate.
5. When the syringe is empty, pull the needle out of the skin, being careful to keep it at the same angle as inserted.
6. There may be a little bleeding at the injection site. You can press a cotton ball or gauze over the injection site for 10 seconds. Do not rub the injection site. If needed, you may cover the injection site with a bandage.
7. f your healthcare provider has instructed you to take two Enbrel injections on the same day, repeat the steps to prepare and give an injection of Enbrel. Choose and prepare a new injection site for the second injection.
8. For the Free-Hand Method: If there is enough solution left in the Enbrel vial for another dose, refrigerate the reconstituted (mixed) Enbrel vial (in the dose tray) after use. Otherwise, discard the Enbrel vial and any remaining solution.
STEP 6: Disposing of Supplies
The syringe, needles, and vial adapter should never be reused. Never recap a needle.
- Put the used syringes, needles, and vials in a FDA-cleared sharps disposal container right away after use. Do not throw away (dispose of) the needles, syringes, and vials in your household trash.
- If you do not have a FDA-cleared sharps disposal container, you may use a household container that is:
- made of a heavy-duty plastic
- can be closed with a tight-fitting, puncture-resistant lid, without sharps being able to come out
- upright and stable during use
- leak-resistant
- properly labeled to warn of hazardous waste inside the container.
- When your sharps disposal container is almost full, you will need to follow your community guidelines for the right way to dispose of your sharps disposal container. There may be state or local laws about how you should throw away used syringes and needles. For more information about safe sharps disposal, and for specific information about sharps disposal in the state that you live in, go to the FDA’s website at: http://www.fda.gov/safesharpsdisposal
- Do not reuse the syringe or vial.
- Do not recycle the syringe, vial, or sharps disposal container or throw them into household trash.
Important: Always keep the sharps disposal container out of the reach of children.
A healthcare provider familiar with Enbrel should answer all questions. Call 1-888-4ENBREL (1-888-436-2735) or visit www.enbrel.com for more information about Enbrel.
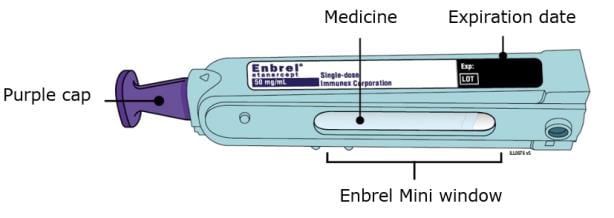
Enbrel AutoTouch reusable autoinjector with Enbrel Mini single-dose cartridge
Read these instructions before using an AutoTouch reusable autoinjector with Enbrel Mini single-dose cartridge for use with Enbrel.Your healthcare provider has prescribed Enbrel AutoTouch reusable autoinjector for your injections. If your healthcare provider decides that you or a caregiver may be able to give your injections of Enbrel at home, you should receive training on the right way to prepare and inject Enbrel. Do not try to inject yourself until you have been shown the right way to give the injections by your healthcare provider. Call your healthcare provider if you or your caregiver has any questions about the right way to inject Enbrel.
| Guide to parts |
| AutoTouch reusable autoinjector |
 Important: The needle is inside Enbrel Mini.
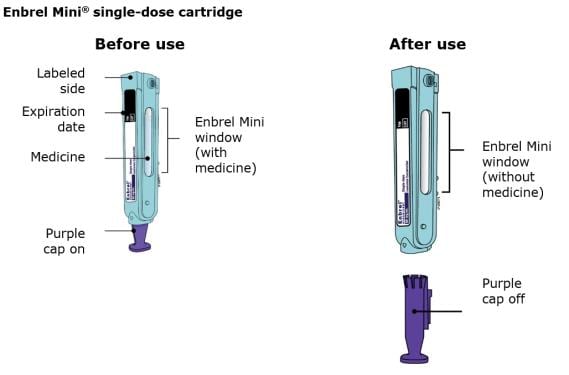
Important
The AutoTouch® reusable autoinjector is used with the Enbrel Mini® single-dose prefilled cartridge to administer your dose of Enbrel®. The Enbrel Mini single-dose prefilled cartridge contains one 50 mg single dose of Enbrel.
Using your Enbrel Mini single-dose cartridges:
- It is important that you do not try to give the injection unless you or your caregiver has received training from your healthcare provider.
- Do not use Enbrel Mini after the expiration date printed on the label.
- Do not shake Enbrel Mini.
- Do not remove the purple cap from Enbrel Mini until it is inside the AutoTouch reusable autoinjector and you are ready to inject.
- Do not use Enbrel Mini if it has been dropped on a hard surface. Part of Enbrel Mini may be broken even if you cannot see the break. Use a new Enbrel Mini cartridge, and call 1-888-4Enbrel (1-888-436-2735).
- Do inspect AutoTouch for physical damage or defects before each use.
- The needle cover inside the purple cap on the Enbrel Mini cartridge contains dry natural rubber, which is made from latex. Tell your healthcare provider if you are allergic to latex.
- Children must weigh at least 138 pounds to use Enbrel Mini. Children who weigh less than 138 pounds should use a different form of Enbrel.
STEP 1: Prepare
A. Remove one Enbrel Mini single-dose cartridge from the carton.
- Put the carton containing any unused Enbrel Mini back in the refrigerator.
- Leave Enbrel Mini at room temperature for at least 30 minutes before injecting.
- Do not put Enbrel Mini back in the refrigerator once it has reached room temperature.
- Do not try to warm Enbrel Mini by using a heat source such as hot water or microwave.
- Do not shake Enbrel Mini.
- Do not remove the purple cap from Enbrel Mini yet.
B. Inspect the Enbrel Mini single-dose prefilled cartridge.
Make sure the medicine in the window is clear and colorless. It is okay if you see small white
particles in the medicine window.
- Do not use Enbrel Mini if the medicine is cloudy or discolored or contains large
lumps, flakes, or colored particles. - Do not use Enbrel Mini if any part appears cracked or broken.
- Do not use Enbrel Mini if the purple cap is missing or not securely attached.
- Do not use Enbrel Mini if the expiration date printed on the label has passed.
In all cases, use a new Enbrel Mini, and call 1-888-4Enbrel (1-888-436-2735).
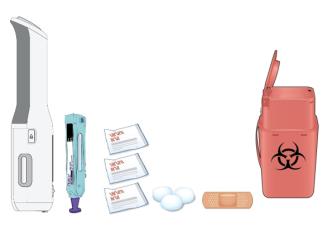
C. Gather all materials you need for your injection.
Wash your hands thoroughly with soap and water.
Place the following on a clean, well-lit, flat surface:
- AutoTouch
- 1 Enbrel Mini
- 3 alcohol wipes
- Cotton ball or gauze pad
- Adhesive bandage
- Sharps disposal container
D. Prepare and clean you injection site. Also clean the injection end of the AutoTouch with a new alcohol wipe.
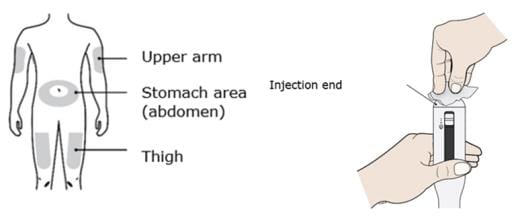
Clean your injection site with an alcohol wipe. Let your skin dry.
You can use:
- Your thigh
- Stomach area (abdomen), except for a 2-inch area right around your navel
- Outer area of upper arm (only if someone else is giving you the injection)
Important:
- Do not touch this area again before injecting.
- Choose a different site each time you give yourself an injection. If you want to use the same injection site, make sure it is not the same spot on the injection site you used for a previous injection.
- Do not inject into areas where the skin is tender, bruised, red, or hard. Avoid injecting into areas with scars or stretch marks.
- If you have psoriasis, you should avoid injecting directly into raised, thick, red, or scaly skin patches or lesions.
STEP 2: Get ready
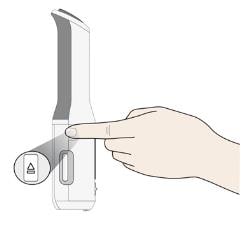
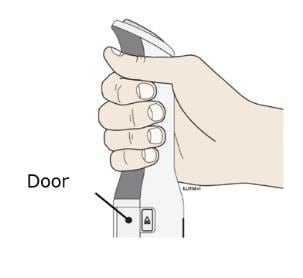
E. Press the door button to open the door.
F. Hold the Enbrel Mini single-dose cartridge with the labeled side facing out and slide into door.
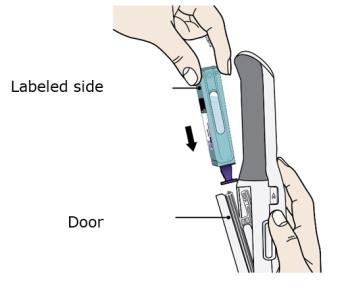
Hold with the labeled side facing out and the purple cap pointing down. Then slide Enbrel Mini into the door. It will slide all the way down into AutoTouch.
- Do not force Enbrel Mini into AutoTouch if it does not slide in easily. Check that it is positioned correctly inside AutoTouch.
G. Close the door.
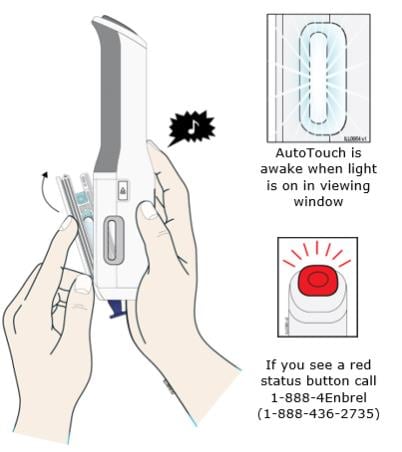
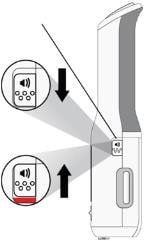
When you see the viewing window light up and hear a “chime”, this means that Enbrel Mini has been loaded properly. AutoTouch is now in the awake mode. Note: If the sound switch is set to the “sounds off” position, you will not hear this sound. To turn the “sounds on”, slide the sound switch down. The red bar will no longer be visible.
| Sound switch Turning sounds off AutoTouch makes sounds (♪) to help guide your injection. When you receive a new AutoTouch, it will be set with the sounds on (sound switch down).
|
Sound Switch
Sounds on Sounds off |
 |
|
Important: Do not remove the purple cap until you are ready to give your injection.
STEP 3: Inject
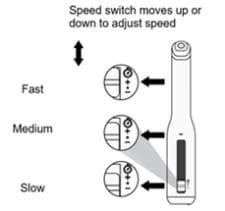
| Changing injection speed The AutoTouch reusable autoinjector allows you to choose the speed of your injection. You can try the three speeds to decide which speed is most comfortable for you.
To change the injection speed:
NOTE: When you receive your AutoTouch reusable autoinjector, the speed will be set to Medium (•). Set the injection speed before you place AutoTouch on your skin and press the start button. The injection speed cannot be changed after you begin an injection. |
 |

You will now be performing the following tasks in order:
- Hold AutoTouch correctly.
- Remove the purple cap.
- Confirm that AutoTouch is “awake.”
- Place and hold AutoTouch on the injection site.
- After the status button turns green, press the status button to start the injection.
- Wait for the injection to finish (ensure that AutoTouch maintains full contact with the skin).
- Confirm the injection is complete.
Do not give your injection until you have read these instructions and feel comfortable with how to use AutoTouch the right way.
H. Hold the AutoTouch reusable autoinjector with fingers wrapped around the gray finger grip as shown.
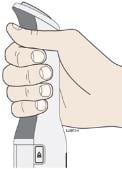
Before placing AutoTouch on your skin, make sure that AutoTouch is “awake.” Look to see that the viewing window light is on. If the viewing light is off this means it is in “sleep mode,” press the status button to “wake it up.”
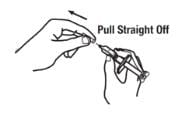
I. When you are ready to inject, pull the purple cap straight down and off. Do not leave the purple cap off for more than 5 minutes. This can dry out the medicine.
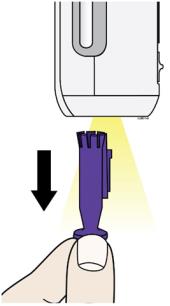
Dispose of the purple cap in a sharps disposal container. Small parts such as the purple cap may cause a choking hazard for children and pets. The AutoTouch site light will turn on to help you see the injection site. It is normal to see a drop of liquid at the end of Enbrel Mini needle or bottom of AutoTouch.
- Do not twist or bend the purple cap.
- Do not put the purple cap back onto AutoTouch.
- Do not remove the purple cap from AutoTouch until you are ready to inject.
If you are unable to inject, please contact your healthcare provider.
J. Place and hold on the skin. Wait for the status button to turn green and a chime to sound.
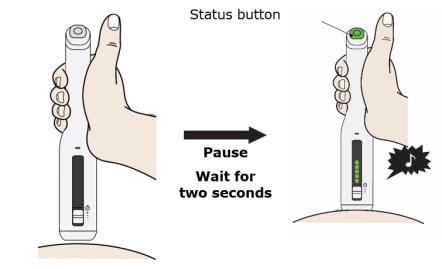
Gently place and hold the AutoTouch reusable autoinjector on your skin and wait 2 seconds for the status button to turn green. You will hear a “chime” (unless the sound switch is set to the “sounds off” position).
- Keep your thumb off the status button during this step.
- Do not press the autoinjector hard on your skin. There is no need to stretch or pinch your skin.
K. Press and release the status button. The status button will start to flash green. You will hear a click when the injection starts.
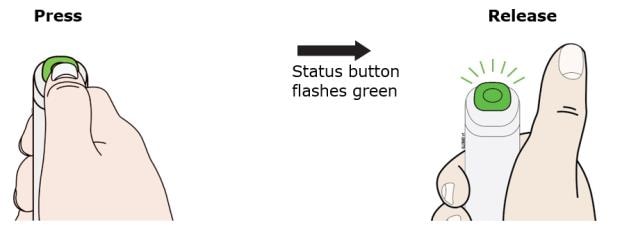
The green status button means your injection has started. You will hear a motor noise and the status button will flash green.
Important: Do not lift AutoTouch off your skin while the injection is in progress. Continue to hold AutoTouch straight and steady.
L. The injection is finished when the green light turns off and a “chime” sounds. Check to make sure you do not see a red status button.
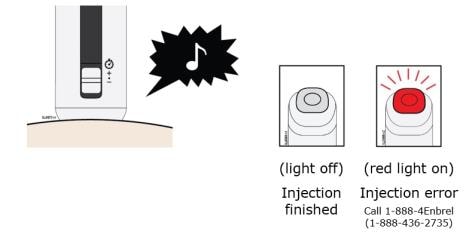
Lift AutoTouch off your skin.
When your injection is finished, you will hear a motor noise for a few seconds. When finished, the door will automatically open. Do not block the door with your hand.
Important: When you remove AutoTouch, if the status button has turned red, call 1-888-4Enbrel (1-888-436-2735). If it looks like the medicine is still injecting or if you see medicine in the Enbrel Mini window, this means you may not have received a full dose. Call your healthcare provider right away.
STEP4: Finish
M. Remove and throw away (dispose of) the Enbrel Mini single-dose prefilled cartridge.
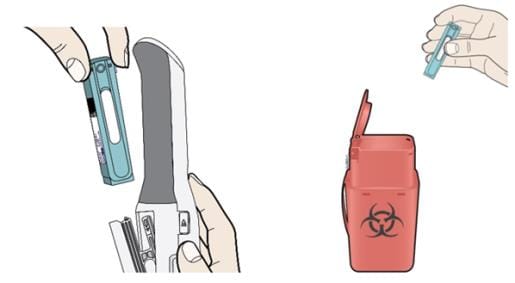
When the door opens, remove Enbrel Mini, close the door, then put it in a FDA-cleared sharps disposal container right away after use. Do not throw away (dispose of) Enbrel Mini in your household trash. If you do not have a FDA-cleared sharps disposal container, you may use a household container that is:
- made of a heavy-duty plastic
- can be closed with a tight-fitting, puncture-resistant lid, without sharps being able to come out
- upright and stable during use
- leak-resistant, and properly labeled to warn of hazardous waste inside the container
When your sharps disposal container is almost full, you will need to follow your community guidelines for the right way to dispose of your sharps disposal container. There may be state or local laws about how you should throw away used needles and syringes. For more information about safe sharps disposal, and for specific information about sharps disposal in the state that you live in, go to the FDA’s website at: http://www.fda.gov/safesharpsdisposal
- Do not reuse Enbrel Mini.
- Do not recycle Enbrel Mini or the sharps disposal container or throw them into household trash.
Important: Always keep the sharps disposal container out of the reach of children.
N. Examine the injection site.
If there is blood, press a cotton ball or gauze pad on your injection site. Do not rub the injection site. Apply an adhesive bandage, if needed.
O. Clean and store the AutoTouch reusable autoinjector.
Clean the injection end of AutoTouch with a new alcohol wipe and allow to dry. Store AutoTouch at room temperature in a dry, safe place such as in a cabinet or drawer.
Important: Do not store AutoTouch in the refrigerator.
Warnings
- No modification of the AutoTouch reusable autoinjector is allowed.
- No part of AutoTouch can be repaired or replaced, including the battery.
- Do not put anything inside the door other than an Enbrel Mini® single-dose prefilled cartridge.
- Do not immerse AutoTouch in water.
- Do not reach inside AutoTouch.
- Do not crush, burn or heat AutoTouch.
- AutoTouch contains moving parts. Keep your fingers out of openings in the injection end or open door.
- Keep AutoTouch and Enbrel Mini out of the reach of children.
- If AutoTouch fails, the maximum amount of medicine you could receive is the contents of the full Enbrel Mini, which is the correct dose.
- Use caution if an error occurs as the needle may be exposed.Carefully dispose of Enbrel Mini in an FDA approved sharps container.
- Call your healthcare provider if you have any concerns regarding an incomplete injection.
- When travelling, keep AutoTouch with you, in your carry-on bags.
- Avoid operating AutoTouch near microwave ovens, wireless routers, baby monitors or other common household electronics that operate using RF transmission. Two meters (six feet) is a reasonable distance. Avoid operating AutoTouch near high magnetic or other fields such as those around MRI, CAT, or PET scanners.
- Do not dispose of AutoTouch in the household trash. Call 1-888-4ENBREL (1-888-436-2735) for a replacement.
Troubleshooting
Error Symbols
The AutoTouch reusable autoinjector makes a chime sound, lights the status button red, and displays an error symbol if there is a problem.
See the following description of each error symbol, possible reasons for the error, and actions you can take.
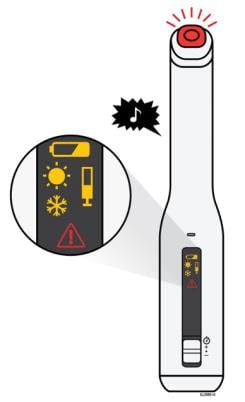
 Low battery
Symbol: Orange battery and error sound.
Problem: The battery is running very low. Less than three weeks or three injections remain. The battery has a life of two years or 130 injections from your first injection. The battery is not replaceable or rechargeable.
Action: Call 1-888-4ENBREL (1-888-436-2735) for a replacement AutoTouch reusable autoinjector.
 Battery Dead
Symbol: Orange battery and red triangle with exclamation point, red status button, and error sound.
Problem: The AutoTouch reusable autoinjector battery is dead.
Action: Call the 1-888-4ENBREL (1-888-436-2735) for a replacement AutoTouch reusable autoinjector.
 Too hot or cold
Symbol: Orange sun and a snowflake, and an error sound.
Problem: AutoTouch is too hot or too cold. This will lock the door.
Action: Place AutoTouch at room temperature in a safe, dry place and allow it to naturally cool or warm to room temperature. Then try again. Store the AutoTouch reusable autoinjector in a dry, safe place, such as a cabinet or drawer at 50˚ F to 104˚ F (10˚ C to 40˚ C).
 Enbrel Mini problem
Symbol: Orange Enbrel Mini single-dose prefilled cartridge with blinking red status button and error alert sound.
Problem: There are five possible reasons you are getting this error. Please read below.
Problem #1: The purple cap was removed before inserting Enbrel Mini.
Action: Wait for the error to clear and close the door without Enbrel Mini in, and try again with a new Enbrel Mini. Make sure to leave the purple cap on until Enbrel Mini has been placed inside the AutoTouch reusable autoinjector and the door is closed. Call 1-888-4ENBREL (1-888-436-2735) for a replacement Enbrel Mini.
Problem #2: Sensor lost skin contact during injection.
Action: Hold the injection end of AutoTouch on your skin throughout the entire injection until the green status button turns off, even if the motor sounds stop. Lifting or shifting on your skin during injection may lead to an incomplete injection. Call your healthcare provider if you feel you have given yourself an incomplete injection.
Problem #3: Enbrel Mini single-dose prefilled cartridge is defective or not recognized as an Amgen product.
Action: Remove Enbrel Mini. Replace with a new Enbrel Mini. Call 1-888-4ENBREL (1-888-436-2735) for a replacement Enbrel Mini.
Problem #4: Door is held closed for more than one minute.
Action: Remove your hand from the door. When the door opens, remove Enbrel Mini from AutoTouch, if present. Wait for the error symbol to stop blinking and close the door. If you have not given yourself an injection, place a new Enbrel Mini in AutoTouch and continue. If the error symbol remains on, call 1-888-4ENBREL (1-888-436-2735).
Problem #5: AutoTouch has been dropped.
Action: A dropped AutoTouch is not safe to use. Call 1-888-4ENBREL (1-888-436-2735) for a replacement.
 Needle Exposure
Symbol: Orange Enbrel Mini single-dose prefilled cartridge, a red triangle with an exclamation point, red status button, and error sound.
Problem: A problem occurred during an injection and the needle may be exposed.
Action: If there is still fluid in Enbrel Mini, an incomplete dose may have been injected. Call your healthcare provider if you feel you have given yourself an incomplete injection. Call 1-888-4ENBREL (1-888-436-2735) for further assistance with your AutoTouch.
Use caution when both Enbrel Mini problem symbol and the AutoTouch reusable autoinjector failure symbols are lit as the needle may be exposed. Take special care when removing and handling Enbrel Mini. Remove Enbrel Mini then put it in a FDA-cleared sharps disposal container.
 AutoTouch Reusable Autoinjector Failure
Symbol: Red triangle with an exclamation point, red status button, and error sound.
Problem: Several errors have occurred or AutoTouch has stopped working.
Action: Reset AutoTouch.
To reset AutoTouch:
Hold AutoTouch away from skin and press the status button to wake AutoTouch. The failure symbol should begin blinking and a chime should sound.
While the failure symbol is blinking, press and hold door button until all symbols are temporarily displayed and the status button blinks green. The door button should be held for at least 10 seconds. After a successful reset, if an Enbrel Mini single-dose prefilled cartridge is still inside AutoTouch, remove it. Close the AutoTouch door. Then, for the next injection, start by pressing the door button to open Enbrel Mini door.
If AutoTouch does not respond after three attempts to reset, call 1-888-4ENBREL (1-888-436-2735).
Troubleshooting common Problems
1. Enbrel Mini single-dose prefilled cartridge is difficult to insert into the door.
Never force Enbrel Mini into the door. When positioned correctly, it will fall freely and completely into and out of the door. If it is difficult to load, double check that you are holding Enbrel Mini as shown.
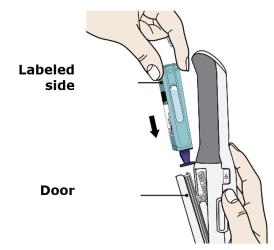
- Purple cap is facing down
- Label facing outwards (away from the handle)
2. Injection does not start when pressing the status button.
Reason #1: Place the AutoTouch reusable autoinjector on your skin and wait for the status button to turn green. A skin sensor is located on the injection end. You cannot start an injection unless the injection end of AutoTouch is touching your skin. Hold the injection end on your skin throughout the entire injection.
Reason #2: AutoTouch may be asleep. To conserve battery power, AutoTouch goes into a “sleep mode” after three minutes of no activity. If it seems unresponsive/asleep, remove AutoTouch from your skin and press the status button to wake it up.
3. An Enbrel Mini error symbol appears immediately after loading the Enbrel Mini single-dose prefilled cartridge.
Reason: This will happen if the purple cap has been removed before inserting Enbrel Mini into the door. Do not reuse or recap. Begin again using a new Enbrel Mini. Do not remove the purple cap until after Enbrel Mini has been inserted into AutoTouch.
4. Injection aborts or an error symbol appears while the injection is in process.
The AutoTouch reusable autoinjector will abort an injection if the sensor loses skin contact. Avoid adjusting or moving AutoTouch during an injection. Hold AutoTouch on your skin until the green status light turns off and the injection is finished. Shifting, repositioning or lifting from your skin during injection may lead to an incomplete dose.
5. AutoTouch door will not remain closed.
Reason #1: At the end of an injection, the door cannot be closed with a used Enbrel Mini® single-dose prefilled cartridge inside.
Reason #2: When AutoTouch experiences a failure, the door will open and remain open. If this occurs, call 1-888-4ENBREL (1-888-436-2735).
6. A chime is repeating but no error lights are showing.
If the door is left open for more than 45 seconds, a chime will sound. Close the door to silence the chime.
7. AutoTouch is not producing chiming sounds.
The sound setting may be off. Turn on by sliding the sound switch down. Enbrel Mini single-dose prefilled cartridge will not eject.
Reason #1: If the viewing window has no light, press the status button to wake up AutoTouch. Then press and hold the door button for at least two seconds to eject.
Reason #2: If Enbrel Mini does not eject automatically at the end of an injection, there may be a problem. Call 1-888-4ENBREL (1-888-436-2735).
8. The purple cap is very hard to remove.
The purple cap should not be removed outside of the AutoTouch reusable autoinjector. It should be removed after it is loaded into AutoTouch, when you are ready to inject. If Enbrel Mini is loaded and the purple cap is difficult to remove, call 1-888-4ENBREL (1-888-436-2735).
9. The injection speed will not change during injection.
Once the injection starts, the speed cannot be changed. Always set the speed prior to injection.
10. The injection is faster or slower than expected.
The speed switch may have been moved unintentionally. Check the speed setting prior to starting each injection.
Label
PETANERCET
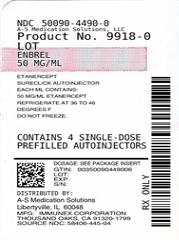
SRC: NLM .