
Basaglar
Generic name: insulin glargine
Drug class: Insulin
Medically reviewed by A Ras MD.
What is Basaglar?
Basaglar is a long-acting man made insulin used to control high blood sugar in adults and children with type 1 diabetes mellitus and adults with type 2 diabetes mellitus. Basaglar is not for use to treat diabetic ketoacidosis. It is not known if Basaglar is safe and effective in children less than 6 years of age with type 1 diabetes mellitus or in children with type 2 diabetes mellitus.
Description
Insulin glargine is a long-acting human insulin analog produced by recombinant DNA technology utilizing a non-pathogenic laboratory strain of Escherichia coli (K12) as the production organism. Insulin glargine differs from human insulin in that the amino acid asparagine at position A21 is replaced by glycine and two arginines are added to the C-terminus of the B-chain. Chemically, insulin glargine is 21A-Gly-30B-a-L-Arg-30Bb-L-Arg-human insulin and has the empirical formula C267H404N72O78S6 and a molecular weight of 6.063 kDa. Insulin glargine has the following structural formula:

BASAGLAR (insulin glargine) injection is a sterile clear and colorless aqueous solution for subcutaneous use. Each mL contains 100 units of insulin glargine (3.6378 mg).
The 3 mL BASAGLAR prefilled pen presentations contain the following inactive ingredients per mL: glycerin (17 mg), metacresol (2.7 mg), zinc oxide (content adjusted to provide 30 mcg zinc ion), and Water for Injection, USP.
The pH is adjusted by addition of aqueous solutions of hydrochloric acid 10% and/or sodium hydroxide 10%. BASAGLAR has a pH of approximately 4.
Mechanism of Action
The primary activity of insulin, including insulin glargine, is regulation of glucose metabolism. Insulin and its analog lower blood glucose by stimulating peripheral glucose uptake, especially by skeletal muscle and fat, and by inhibiting hepatic glucose production. Insulin inhibits lipolysis and proteolysis, and enhances protein synthesis.
Who should not use Basaglar?
Do not use Basaglar if you:
- are having an episode of low blood sugar (hypoglycemia).
- have an allergy to insulin glargine or any of the ingredients in Basaglar. See the end of this Patient Information guide for a complete list of ingredients in Basaglar.
What should I tell my healthcare provider before taking Basaglar?
Before using Basaglar, tell your healthcare provider about all your medical conditions, including if you:
- have liver or kidney problems.
- take any other medicines, especially ones commonly called TZDs (thiazolidinediones).
- have heart failure or other heart problems. If you have heart failure, it may get worse while you take TZDs with Basaglar.
- are pregnant, planning to become pregnant, or are breastfeeding. It is not known if Basaglar may harm your unborn or breastfeeding baby.
Tell your healthcare provider about all the medicines you take, including prescription and over-the-counter medicines, vitamins and herbal supplements.
Before you start using Basaglar, talk to your healthcare provider about low blood sugar and how to manage it.
How should I take Basaglar?
- Read the detailed Instructions for Use that come with your Basaglar.
- Use Basaglar exactly as your healthcare provider tells you to. Your healthcare provider should tell you how much Basaglar to use and when to use it.
- Know the amount of Basaglar you use. Do not change the amount of Basaglar you use unless your healthcare provider tells you to.
- Check your insulin label each time you give your injection to make sure you are using the correct insulin.
- Basaglar may be used at any time during the day, but Basaglar should be used at the same time each day.
- Only use Basaglar that is clear and colorless. If your Basaglar is cloudy or slightly colored, return it to your pharmacy for a replacement.
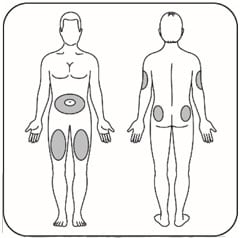
- Basaglar is injected under the skin (subcutaneously) of your stomach area, buttocks, upper legs or upper arms. Do not use Basaglar in an insulin pump or inject Basaglar into your vein (intravenously).
- Change (rotate) your injection sites within the area you chose with each dose to reduce your risk of getting lipodystrophy (pits in skin or thickened skin) and localized cutaneous amyloidosis (skin with lumps) at the injection sites.
- Do not use the exact same spot for each injection.
- Do not inject where the skin has pits, is thickened, or has lumps.
- Do not inject where the skin is tender, bruised, scaly or hard, or into scars or damaged skin.
- Do not mix Basaglar with any other type of insulin.
- Always use a new needle for each injection to help prevent infections and blocked needles. Do not reuse or share your needles with other people. You may give other people a serious infection or get a serious infection from them.
- Check your blood sugar levels. Ask your healthcare provider what your blood sugar should be and when you should check your blood sugar levels.
- Do not share your single-patient-use Basaglar prefilled pen with other people, even if the needle has been changed. You may give other people a serious infection or get a serious infection from them.
Your dose of Basaglar may need to change because of:
- change in level of physical activity or exercise
- weight gain or loss
- increased stress
- illness
- change in diet
- because of other medicines you take.
What should I avoid while taking Basaglar?
While using Basaglar do not:
- drive or operate heavy machinery, until you know how Basaglar affects you.
- drink alcohol or use over-the-counter medicines that contain alcohol.
What are the possible side effects of Basaglar?
Basaglar may cause serious side effects that can lead to death, including:
- Low blood sugar (hypoglycemia). Signs and symptoms that may indicate low blood sugar include:
- dizziness or light-headedness
- sweating
- confusion
- headache
- blurred vision
- slurred speech
- shakiness
- fast heartbeat
- anxiety
- irritability or mood change
- hunger
- Severe allergic reaction (whole body reaction). Get medical help right away if you have any of these signs or symptoms of a severe allergic reaction:
- a rash over your whole body
- trouble breathing
- a fast heartbeat
- sweating
- Low potassium in your blood (hypokalemia).
- Heart failure. Taking certain diabetes pills called thiazolidinediones or “TZDs” with Basaglar may cause heart failure in some people. This can happen even if you have never had heart failure or heart problems before. If you already have heart failure it may get worse while you take TZDs with Basaglar. Your healthcare provider should monitor you closely while you are taking TZDs with Basaglar. Tell your healthcare provider if you have any new or worse symptoms of heart failure including: shortness of breath, swelling of your ankles or feet, or sudden weight gain. Treatment with TZDs and Basaglar may need to be changed or stopped by your healthcare provider if you have new or worse heart failure. Get emergency medical help if you have:
- trouble breathing,
- shortness of breath
- fast heartbeat
- swelling of your face, tongue, or throat
- sweating
- extreme drowsiness
- dizziness
- confusion
The most common side effects of Basaglar include:
- low blood sugar (hypoglycemia)
- allergic reactions
- including reactions at the injection site
- skin thickening or pits at the injection site (lipodystrophy)
These are not all the possible side effects of Basaglar. Call your doctor for medical advice about side effects. You may report side effects to FDA at 1-800-FDA-1088 (1-800-332-1088).
General information about the safe and effective use of Basaglar
Medicines are sometimes prescribed for purposes other than those listed in a Patient Information guide. Do not use Basaglar for a condition for which it was not prescribed. Do not give Basaglar to other people, even if they have the same symptoms that you have. It may harm them.
This Patient Information guide summarizes the most important information about Basaglar. If you would like more information, talk with your healthcare provider. You can ask your pharmacist or healthcare provider for information about Basaglar that is written for health professionals. For more information, go to www.Basaglar.com or call 1-800-545-5979.
How do I store Basaglar?
Unused Pens
- Store unused Pens in the refrigerator at 36°F to 46°F (2°C to 8°C).
- Do not freeze Basaglar. Do not use if it has been frozen.
- Unused Pens may be used until the expiration date printed on the Label, if the Pen has been kept in the refrigerator.
In-use Pens
- Store the Pen you are currently using at room temperature [up to 86°F (30°C)] and away from heat and light.
- Throw away the Pen you are using after 28 days, even if it still has insulin left in it.
Keep Basaglar and all medicines out of the reach of children.
What are the ingredients in Basaglar?
- Active ingredient: insulin glargine
- Inactive ingredients: glycerin, metacresol, zinc, and Water for Injection, USP.
Hydrochloric acid and/or sodium hydroxide may be added to adjust the pH.
Instructions for use
- Basaglar KwikPen
- Basaglar Tempo Pen
Basaglar KwikPen
insulin glargine injection (100 units/mL, 3 mL single-patient-use pen)

Read the Instructions for Use before you start using Basaglar and each time you get another Basaglar KwikPen. There may be new information. This information does not take the place of talking to your healthcare provider about your medical condition or your treatment.
Do not share your Basaglar KwikPen with other people, even if the needle has been changed. You may give other people a serious infection or get a serious infection from them.
Basaglar KwikPen (“Pen”) is a disposable single-patient-use prefilled pen containing 300 units (3mL) of Basaglar. One pen contains multiple doses of medicine.
- Your healthcare provider will tell you how many units to give as your dose and how to inject your prescribed dose of medicine.
- You can give a dose of 1 to 80 units in a single injection.
- If your prescribed dose is more than 80 units, you will need to give yourself more than 1 injection.
- The plunger only moves a little with each injection, and you may not notice that it moves. When the plunger reaches the end of the cartridge, you have used all 300 units in the Pen.
People who are blind or have vision problems should not use the Pen without help from a person trained to use the Pen.
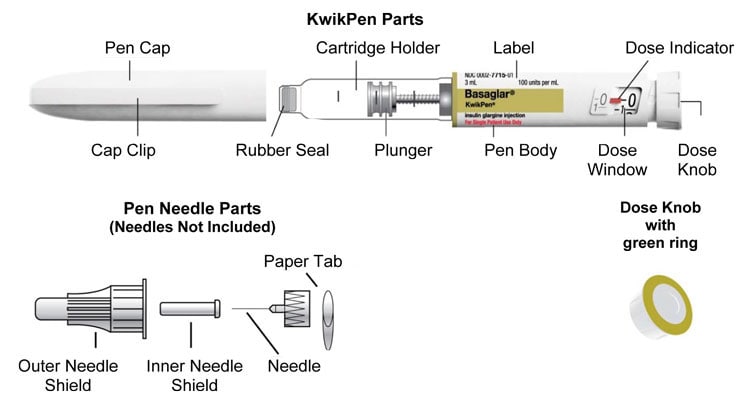
How to recognize your Basaglar KwikPen
- Pen color: Light grey
- Dose Knob: Light grey with green ring on the end
- Labels: Light grey with green color bars
Supplies needed to give your injection
- Basaglar KwikPen
- KwikPen compatible Needle (Becton, Dickinson and Company Pen Needles recommended)
- Alcohol swab
Preparing your Pen
- Wash your hands with soap and water.
- Check the Pen to make sure you are taking the right type of insulin. This is especially important if you use more than 1 type of insulin.
- Do not use your Pen past the expiration date printed on the Label or for more than 28 days after you first start using the Pen.
- Always use a new needle for each injection to help prevent infections and blocked needles. Do not reuse or share your needles with other people. You may give other people a serious infection or get a serious infection from them.
Step 1:
- Pull the Pen Cap straight off.
- Do not remove the Pen Label.
- Wipe the Rubber Seal with an alcohol swab.
Step 2:
- Check the liquid in the Pen.
- Basaglar should look clear and colorless. Do not use if it is cloudy, colored, or has particles or clumps in it.

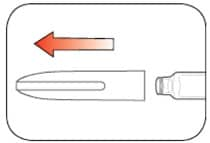
Step 3:
- Select a new Needle.
- Pull off the Paper Tab from the Outer Needle Shield.
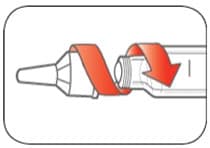
Step 4:
- Push the capped Needle straight onto the Pen and twist the Needle on until it is tight.

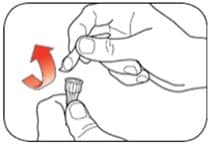
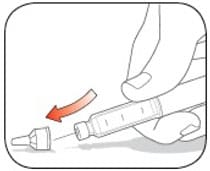
Step 5:
- Pull off the Outer Needle Shield. Do not throw it away.
- Pull off the Inner Needle Shield and throw it away.
Priming your Pen
Prime before each injection.
- Priming means removing the air from the Needle and Cartridge that may collect during normal use. It is important to prime your Pen before each injection so that it will work correctly.
- If you do not prime before each injection, you may get too much or too little insulin.
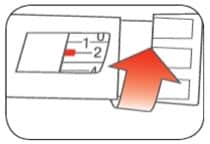
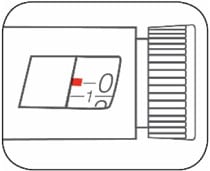
Step 6:
- To prime your Pen, turn the Dose Knob to select 2 units.
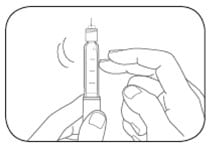
Step 7:
- Hold your Pen with the Needle pointing up. Tap the Cartridge Holder gently to collect air bubbles at the top.
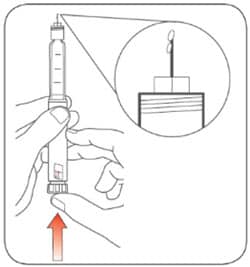
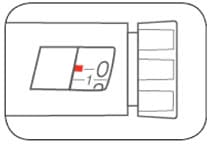
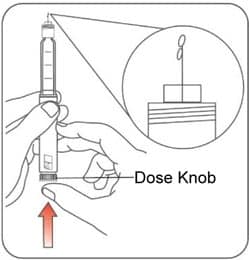
Step 8:
- Continue holding your Pen with Needle pointing up. Push the Dose Knob in until it stops, and “0” is seen in the Dose Window. Hold the Dose Knob in and count to 5 slowly.You should see insulin at the tip of the Needle.
- If you do not see insulin, repeat the priming steps, but not more than 4 times.
- If you still do not see insulin, change the Needle and repeat the priming steps.
- Small air bubbles are normal and will not affect your dose.

Selecting your dose
- If your dose is more than 80 units, you will need to give more than 1 injection.
- Talk to your healthcare provider about how to give your dose.
- Use a new Needle for each injection and repeat the priming step.
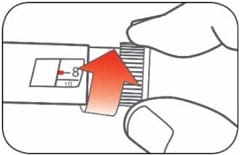
Step 9:
- Turn the Dose Knob to select the number of units you need to inject. The Dose Indicator should line up with your dose.
- The Pen dials 1 unit at a time.
- The Dose Knob clicks as you turn it.
- Do not dial your dose by counting the clicks because you may dial the wrong dose.
- The dose can be corrected by turning the Dose Knob in either direction until the correct dose lines up with the Dose Indicator.
- The even numbers are printed on the dial.
- The odd numbers, after the number 1, are shown as full lines.
- Always check the number in the Dose Window to make sure you have dialed the correct dose.
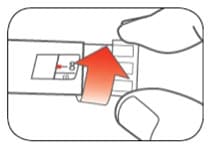

(Example: 12 units shown in the Dose Window)
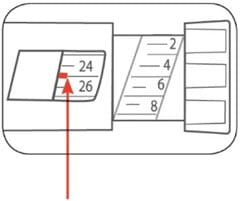
(Example: 25 units shown in the Dose Window)
The Pen will not let you dial more than the number of units left in the Pen.
- If you need to inject more than the number of units left in the Pen, you may either:
- inject the amount left in your Pen and then use a new Pen to give the rest of your dose, or
- get a new Pen and inject the full dose.
- It is normal to see a small amount of insulin left in the Pen that you can not inject.
Giving your injection
- Inject your insulin as your healthcare provider has shown you.
- Change (rotate) your injection sites within the area you choose for each dose to reduce your risk of getting lipodystrophy (pits in skin or thickened skin) and localized cutaneous amyloidosis (skin with lumps) at the injection sites. Do not inject where the skin has pits, is thickened, or has lumps. Do not inject where the skin is tender, bruised, scaly or hard, or into scars or damaged skin.
- Do not try to change your dose while injecting.
Step 10:
Choose your injection site.
- Basaglar is injected under the skin (subcutaneously) of your stomach area, buttocks, upper legs or upper arms.
- Wipe the skin with an alcohol swab, and let the injection site dry before you inject your dose.
Step 11:
- Insert the Needle into your skin.
- Push the Dose Knob all the way in.
- Continue to hold the Dose Knob in and slowly count to 5 before removing the needle.
Note: Do not try to inject your insulin by turning the Dose Knob. You will not receive your insulin by turning the Dose Knob.


Step 12:
- Pull the Needle out of your skin.
- A drop of insulin at the Needle tip is normal. It will not affect your dose.
- Check the number in the Dose Window
- If you see “0” in the Dose Window, you have received the full amount you dialed.
- If you do not see “0” in the Dose Window you did not receive your full dose. Do not redial. Insert the needle into your skin and finish your injection.
- If you still do not think you received the full amount you dialed for your injection, do not start over or repeat that injection. Monitor your blood glucose and call your healthcare provider for further instructions.
- If you normally need to give 2 injections for your full dose, be sure to give your second injection.
- The plunger only moves a little with each injection, and you may not notice that it moves.
- If you see blood after you take the Needle out of your skin, press the injection site lightly with a piece of gauze or an alcohol swab. Do not rub the area.
After your injection
Step 13:
- Carefully replace the Outer Needle Shield.
Step 14:
- Unscrew the capped Needle and throw it away (see Disposing of Pens and Needles section below).
- Do not store the Pen with the Needle attached to prevent leaking, blocking the Needle, and air from entering the Pen.
Step 15:
- Replace the Pen Cap by lining up the Cap Clip with the Dose Indicator and pushing straight on.
Disposing of Pens and Needles
- Put your used needles in a FDA-cleared sharps disposal container right away after use. Do not throw away (dispose of) loose needles in your household trash.
- If you do not have a FDA-cleared sharps disposal container, you may use a household container that is:
- made of a heavy-duty plastic,
- can be closed with a tight-fitting, puncture-resistant lid, without sharps being able to come out,
- upright and stable during use,
- leak-resistant, and
- properly labeled to warn of hazardous waste inside the container.
- When your sharps disposal container is almost full, you will need to follow your community guidelines for the right way to dispose of your sharps disposal container. There may be state or local laws about how you should throw away used needles and syringes. For more information about safe sharps disposal, and for specific information about sharps disposal in the state that you live in, go to the FDA’s website at: http://www.fda.gov/safesharpsdisposal
- Do not dispose of your used sharps disposal container in your household trash unless your community guidelines permit this. Do not recycle your used sharps disposal container.
- The used Pen may be discarded in your household trash after you have removed the needle.
General information about the safe and effective use of your Pen
- Keep your Pen and needles out of the sight and reach of children.
- Always use a new needle for each injection.
- Do not share your Pen or needles with other people. You may give other people a serious infection or get a serious infection from them.
- Do not use your Pen if any part looks broken or damaged.
- Always carry an extra Pen in case yours is lost or damaged.
Troubleshooting
- If you can not remove the Pen Cap, gently twist the cap back and forth, and then pull the cap straight off.
- If the Dose Knob is hard to push:
- Pushing the Dose Knob more slowly will make it easier to inject.
- Your Needle may be blocked. Put on a new Needle and prime the Pen.
- You may have dust, food, or liquid inside the Pen. Throw the Pen away and get a new Pen.
If you have any questions or problems with your Basaglar KwikPen, contact Lilly at 1-800-LillyRx (1-800- 545-5979) or call your healthcare provider for help. For more information on Basaglar KwikPen and insulin, go to www.Basaglar.com.
Basaglar Tempo Pen
Insulin glargine injection (100 units/mL, 3 mL pen, single-patient-use)

Read the Instructions for Use before you start using Basaglar and each time you get another Basaglar Tempo Pen. There may be new information. This information does not take the place of talking to your healthcare provider about your medical condition or your treatment.
Do not share your Basaglar Tempo Pen with other people, even if the needle has been changed. You may give other people a serious infection or get a serious infection from them.
Basaglar Tempo Pen (“Pen”) is a disposable single-patient-use prefilled pen containing 300 units (3mL) of Basaglar. One pen contains multiple doses of medicine.
- Your healthcare provider will tell you how many units to give as your dose and how to inject your prescribed dose of medicine.
- You can give a dose of 1 to 80 units in a single injection.
- If your prescribed dose is more than 80 units, you will need to give yourself more than 1 injection.
- The Plunger only moves a little with each injection, and you may not notice that it moves. When the Plunger reaches the end of the cartridge, you have used all 300 units in the Pen.
People who are blind or have vision problems should not use the Pen without help from a person trained to use the Pen.
This Basaglar Tempo Pen contains a component that allows for data connectivity when used with a compatible transmitter.
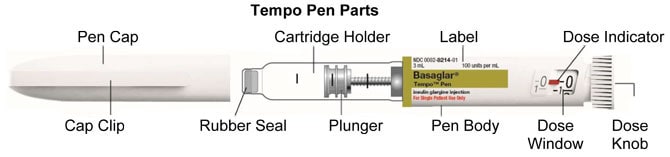
How to recognize your Basaglar Tempo Pen
- Pen color: Light grey
- Dose Knob: Light grey
- Labels: Light grey with green color bars
Supplies needed to give your injection
- Basaglar Tempo Pen
- Tempo Pen compatible Needle (Becton, Dickinson and Company Pen Needles recommended)
- Alcohol swab
Preparing your Pen
- Wash your hands with soap and water.
- Check the Pen to make sure you are taking the right type of insulin. This is especially important if you use more than 1 type of insulin.
- Do not use your Pen past the expiration date printed on the Label or for more than 28 days after you first start using the Pen.
- Always use a new needle for each injection to help prevent infections and blocked needles. Do not reuse or share your needles with other people. You may give other people a serious infection or get a serious infection from them.
Step 1:
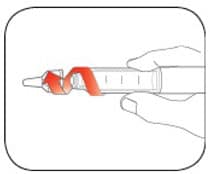
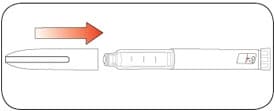
- Pull the Pen Cap straight off.
- Do not remove the Pen Label.
- Wipe the Rubber Seal with an alcohol swab.

Step 2:
- Check the liquid in the Pen.
Basaglar should look clear and colorless. Do not use if it is cloudy, colored, or has particles or clumps in it.

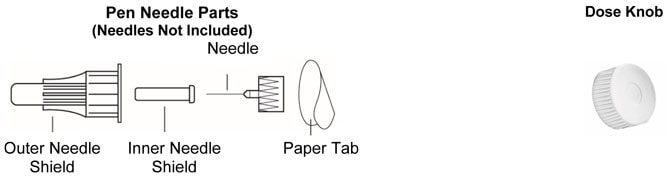
Step 3:
- Select a new Needle.
- Pull off the Paper Tab from the Outer Needle Shield.

Step 4:
- Push the capped Needle straight onto the Pen and twist the Needle on until it is tight.
Step 5:
- Pull off the Outer Needle Shield. Do not throw it away.
- Pull off the Inner Needle Shield and throw it away.

Priming your Pen
Prime before each injection.
- Priming means removing the air from the Needle and Cartridge that may collect during normal use. It is important to prime your Pen before each injection so that it will work correctly.
- If you do not prime before each injection, you may get too much or too little insulin.
Step 6:
- To prime your Pen, turn the Dose Knob to select 2 units.
Step 7:
- Hold your Pen with the Needle pointing up. Tap the Cartridge Holder gently to collect air bubbles at the top.
Step 8:
- Continue holding your Pen with the Needle pointing up. Push the Dose Knob in until it stops, and “0” is seen in the Dose Window. Hold the Dose Knob in and count to 5 slowly.
You should see insulin at the tip of the Needle.- If you do not see insulin, repeat the priming steps 6 to 8, but not more than 4 times.
- If you still do not see insulin, change the Needle and repeat the priming steps 6 to 8.
- Small air bubbles are normal and will not affect your dose.
Selecting your dose
- You can give a dose of 1 to 80 units in a single injection.
- If your dose is more than 80 units, you will need to give more than 1 injection.
- Talk to your healthcare provider about how to give your dose.
- Use a new Needle for each injection and repeat the priming step.
Step 9:
- Turn the Dose Knob to select the number of units you need to inject. The Dose Indicator should line up with your dose.
- The Pen dials 1 unit at a time.
- The Dose Knob clicks as you turn it.
- Do not dial your dose by counting the clicks because you may dial the wrong dose.
- The dose can be corrected by turning the Dose Knob in either direction until the correct dose lines up with the Dose Indicator.
- The even numbers are printed on the dial.
- The odd numbers, after the number 1, are shown as full lines.
- Always check the number in the Dose Window to make sure you have dialed the correct dose.
(Example: 12 units shown in the Dose Window)
(Example: 25 units shown in the Dose Window)
The Pen will not let you dial more than the number of units left in the Pen.
- If you need to inject more than the number of units left in the Pen, you may either:
- inject the amount left in your Pen and then use a new Pen to give the rest of your dose, or
- get a new Pen and inject the full dose.
- It is normal to see a small amount of insulin left in the Pen that you can not inject.
Giving your injection
- Inject your insulin as your healthcare provider has shown you.
- Change (rotate) your injection sites within the area you choose for each dose to reduce your risk of getting lipodystrophy (pits in skin or thickened skin) and localized cutaneous amyloidosis (skin with lumps) at the injection sites. Do not inject where the skin has pits, is thickened, or has lumps. Do not inject where the skin is tender, bruised, scaly or hard, or into scars or damaged skin.
- Do not try to change your dose while injecting.
Step 10:
Choose your injection site.
- Basaglar is injected under the skin (subcutaneously) of your stomach area, buttocks, upper legs or upper arms.
- Wipe the skin with an alcohol swab, and let the injection site dry before you inject your dose.
Step 11:
- Insert the Needle into your skin.
- Push the Dose Knob all the way in.
- Continue to hold the Dose Knob in and slowly count to 5 before removing the needle.
Note: Do not try to inject your insulin by turning the Dose Knob. You will not receive your insulin by turning the Dose Knob.
Step 12:
- Pull the Needle out of your skin.
- A drop of insulin at the Needle tip is normal. It will not affect your dose.
- Check the number in the Dose Window
- If you see “0” in the Dose Window, you have received the full amount you dialed.
- If you do not see “0” in the Dose Window you did not receive your full dose. Do not redial. Insert the needle into your skin and finish your injection.
- If you still do not think you received the full amount you dialed for your injection, do not start over or repeat that injection. Monitor your blood glucose and call your healthcare provider for further instructions.
- If you normally need to give 2 injections for your full dose, be sure to give your second injection.
- The plunger only moves a little with each injection, and you may not notice that it moves.
- If you see blood after you take the Needle out of your skin, press the injection site lightly with a piece of gauze or an alcohol swab. Do not rub the area.
After your injection
Step 13:
- Carefully replace the Outer Needle Shield.
Step 14:
- Unscrew the capped Needle and throw it away (see Disposing of Pens and Needles section below).
- Do not store the Pen with the Needle attached to prevent leaking, blocking the Needle, and air from entering the Pen.

Step 15:
- Replace the Pen Cap by lining up the Cap Clip with the Dose Indicator and pushing straight on.
Disposing of Pens and Needles
- Put your used needles in a FDA-cleared sharps disposal container right away after use. Do not throw away (dispose of) loose needles in your household trash.
- If you do not have a FDA-cleared sharps disposal container, you may use a household container that is:
- made of a heavy-duty plastic,
- can be closed with a tight-fitting, puncture-resistant lid, without sharps being able to come out,
- upright and stable during use,
- leak-resistant, and
- properly labeled to warn of hazardous waste inside the container.
- When your sharps disposal container is almost full, you will need to follow your community guidelines for the right way to dispose of your sharps disposal container. There may be state or local laws about how you should throw away used needles and syringes. For more information about safe sharps disposal, and for specific information about sharps disposal in the state that you live in, go to the FDA’s website at: http://www.fda.gov/safesharpsdisposal
- Do not dispose of your used sharps disposal container in your household trash unless your community guidelines permit this. Do not recycle your used sharps disposal container.
- The used Pen may be discarded in your household trash after you have removed the needle.
General information about the safe and effective use of your Pen
- Keep your Pen and needles out of the sight and reach of children.
- Always use a new needle for each injection.
- Do not share your Pen or needles with other people. You may give other people a serious infection or get a serious infection from them.
- Do not use your Pen if any part looks broken or damaged.
- Always carry an extra Pen in case yours is lost or damaged.
Troubleshooting
- If you can not remove the Pen Cap, gently twist the cap back and forth, and then pull the cap straight off.
- If the Dose Knob is hard to push:
- Pushing the Dose Knob more slowly will make it easier to inject.
- Your Needle may be blocked. Put on a new Needle and prime the Pen.
- You may have dust, food, or liquid inside the Pen. Throw the Pen away and get a new Pen
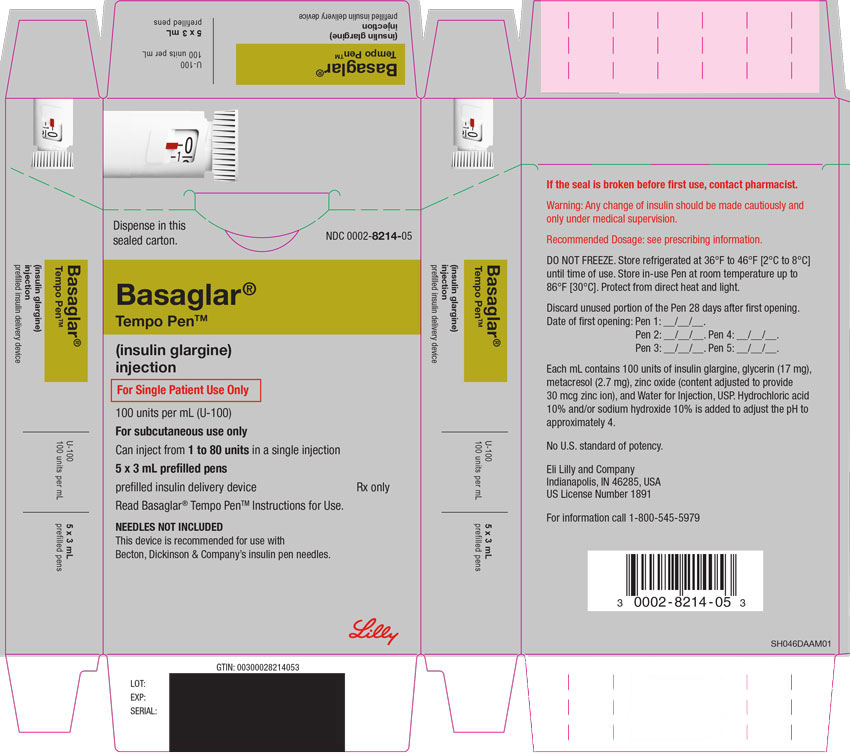
Label
PACKAGE CARTON – BASAGLAR Tempo Pen 80 UNIT PEN
- Dispense in this sealed carton.
- NDC 0002-8214-05
- Basaglar®
- Tempo Pen™
- (insulin glargine)
injection - For Single Patient Use Only
- 100 units per mL (U-100)
- For subcutaneous use only
- Can inject from 1 to 80 units in a single injection
- 5 x 3 mL prefilled pens
- prefilled insulin delivery device
- Rx only
- Read Basaglar® Tempo Pen™ Instructions for Use.
- NEEDLES NOT INCLUDED
- This device is recommended for use with Becton, Dickinson & Company’s insulin pen needles.
- Lilly
SRC: NLM .